

Migrating your website to a new host boils down to three big moves: backing up everything (files and database), uploading that backup to your new server, and then pointing your domain's DNS settings to the new location. When you approach it this way, you minimize downtime and keep your data safe from start to finish.
Your Pre-Migration Game Plan
Before you even think about moving a single file, you need a solid game plan. Rushing into a migration is how you end up with broken links, missing data, and a site that’s offline for hours—or worse, days.

You'll get very familiar with interfaces like this cPanel dashboard. But before you dive into tools like File Manager or phpMyAdmin, some careful prep work will save you a world of headaches. Think of this as your pre-flight check; it’s all about setting yourself up for a smooth landing.
To keep things organized, here's a quick look at the essential tasks to tackle before you kick off the migration.
Pre-Migration Checklist Key Areas
| Checklist Item | Why It's Critical | Actionable Tip |
|---|---|---|
| Hosting Provider Selection | The new host's performance, support, and security directly impact your site's success. | Don't just look at price. Read recent reviews focusing on support response times and uptime reliability. |
| Website & SEO Audit | Creates a "before" picture to compare against after the move, making it easy to spot issues. | Use a tool like Google PageSpeed Insights to record your current load times and an SEO tool to log your top keyword rankings. |
| Content & Asset Inventory | Ensures no files, images, or database tables get left behind during the transfer. | Run a site crawl to identify all URLs, images, and scripts. This is also a great time to find and fix any 404 errors. |
| Communication Plan | Keeps your team and users informed, minimizing confusion if minor hiccups occur. | Draft a simple internal memo and a brief site notice you can post if the migration takes longer than expected. |
Completing these steps gives you a clear roadmap and a safety net, turning a potentially stressful technical task into a well-managed project.
Choosing Your New Hosting Provider
The very first decision you’ll make is your most important: picking a new web host. It's easy to get lured in by the lowest price, but that's often a mistake you'll pay for later with slow speeds, poor security, and frustrating downtime.
A huge part of your pre-migration strategy is choosing the right web hosting service. You need to look past the marketing hype and focus on what really matters:
- Performance: Does the host use modern tech like SSD storage? Do they offer a 99.9% uptime guarantee? Server location matters, too—pick one close to your audience.
- Support: What happens when your site goes down at 2 AM? You need access to a knowledgeable 24/7 support team that actually solves problems.
- Scalability: Your site will hopefully grow. Make sure your host offers an easy way to upgrade your plan when you need more resources.
- Security: Look for essentials like free SSL certificates, automated backups, and proactive malware scanning.
For a much deeper dive, our expert guide on how to choose website hosting will walk you through comparing different providers and making the right call.
Auditing Your Current Website
Before you start packing the digital boxes, you have to know exactly what you're moving. A thorough site audit gives you a baseline, making it dead simple to measure success and spot anything that went wrong after the move. So many people skip this, then panic when they can't figure out why their traffic dropped or a key feature is broken.
This isn't just busywork. It's about being methodical. Your audit should be a complete snapshot of your site's health before a single thing changes.
Pro Tip: Your pre-migration audit is the perfect opportunity to clean house. Get rid of old plugins you aren't using, delete draft pages from two years ago, and clean up your media library. You'll be moving a leaner, faster version of your site.
Start by opening up a spreadsheet. This will become your command center for the whole migration.
Technical and SEO Benchmarks
First, get your performance baseline. Use a tool like Google PageSpeed Insights to check your current load times for both desktop and mobile. Make a note of your Core Web Vitals scores and any other key metrics.
Next, log your current search rankings for your most important keywords. This data is pure gold for confirming your SEO didn't take a hit after the migration. While you're at it, run a full site crawl to hunt for existing problems like:
- 404 errors (broken links)
- Duplicate content issues
- Missing title tags or meta descriptions
- Long redirect chains
Fixing these things now is far easier than trying to troubleshoot them on a new server. It ensures you’re not just moving your site—you’re improving it in the process.
Safeguarding Your Data with a Comprehensive Backup
Before you touch a single thing, let's talk about the most critical step in this entire process: creating a rock-solid backup. Seriously, don't skip this. Think of it as your digital insurance policy—the safety net that lets you hit "undo" if anything goes sideways.
A small migration hiccup can quickly spiral into a full-blown disaster without a good backup. The goal here is to secure two distinct but equally vital parts of your website: all its files and the database that powers it.
Let's be real: downtime and server glitches are a huge worry during a migration. They can erode user trust in an instant. The stats are pretty sobering—over 80% of B2B website migrations fail when they aren't managed meticulously, often due to technical snags, lost data, or just poor planning. On top of that, security mistakes, which are common when moving sites, are responsible for a shocking 70% of data breaches in cloud migrations. This just goes to show how important it is to get this part right.
The Easy Route: WordPress Plugin Backups
For most people running a WordPress site, using a backup plugin is a no-brainer. It's the simplest and most reliable way to go. These tools are built to neatly package your entire site—themes, plugins, images, and the database—into one portable file.
Instead of getting your hands dirty with server files, a good plugin does all the heavy lifting for you with just a few clicks. My advice? Look for plugins with a ton of positive reviews and recent updates. Here are a few I've seen work well time and again:
- All-in-One WP Migration: A crowd favorite for a reason. Its export and import function is incredibly straightforward, making it perfect for small to medium-sized sites.
- UpdraftPlus: This one is a powerhouse, especially if you want to automate your backups. You can set it to send your backup files directly to cloud storage like Google Drive or Dropbox on a schedule.
- Duplicator: As the name implies, this plugin is designed specifically for cloning and moving sites. It bundles your site into a "package" that makes re-installation on a new server a breeze.
Using a plugin really cuts down on the chance of human error. It’s the path I recommend for most situations.
Full Control: Manual Backups
If you're more of a hands-on person or you're not on WordPress, a manual backup gives you total control. This means you'll be handling the files and the database separately, usually through your host's control panel, like cPanel.
Backing Up Your Website Files
First up are your website files. This includes everything from the core CMS files to your themes, plugins, images, and other media. The most common way to grab these is through cPanel's File Manager.
- Log into your current host’s cPanel.
- Find the File Manager and head to your site’s root directory (this is usually
public_html). - Select everything inside that folder.
- Use the "Compress" function to create a single
.ziparchive. - Once it's done, download that
.zipfile to your computer.
Backing Up Your Website Database
Next is the database, which holds all your content—posts, pages, user accounts, and settings. You’ll use a tool called phpMyAdmin for this part.
- From the cPanel dashboard, open phpMyAdmin.
- On the left-hand side, click to select your website's database.
- Click the "Export" tab at the top of the screen.
- The "Quick" export method is usually fine. Just make sure the format is set to "SQL".
- Click "Go," and it will download a
.sqlfile. That’s your complete database backup.
A single backup is a single point of failure. I always tell people to store their backups in at least two separate, secure places. Keep one copy on your local computer and another in a cloud service you trust, like Google Drive or Dropbox.
For anyone managing a more complex site where data integrity is everything, you might need to go a step further. Beyond a simple one-time backup, looking into a guide to database replication software can introduce you to strategies for continuous data protection. This is a more advanced approach, but it's designed to keep your data constantly synchronized and available, which can drastically minimize downtime during a move.
Moving Your Site: Files and Database
Alright, you've got your backup ready and waiting. Now for the main event: moving everything over to your new host. This is where we get a bit technical, but don't worry, it's a completely logical process.
At its core, a website migration is about moving two distinct parts: all your files (think themes, plugins, and images) and your database (all the content, like posts, pages, and user info). Once they’re both on the new server, the last piece of the puzzle is telling them how to talk to each other again.
This flowchart gives you a great visual of how these two streams—files and database—work in parallel before coming together on the new host.
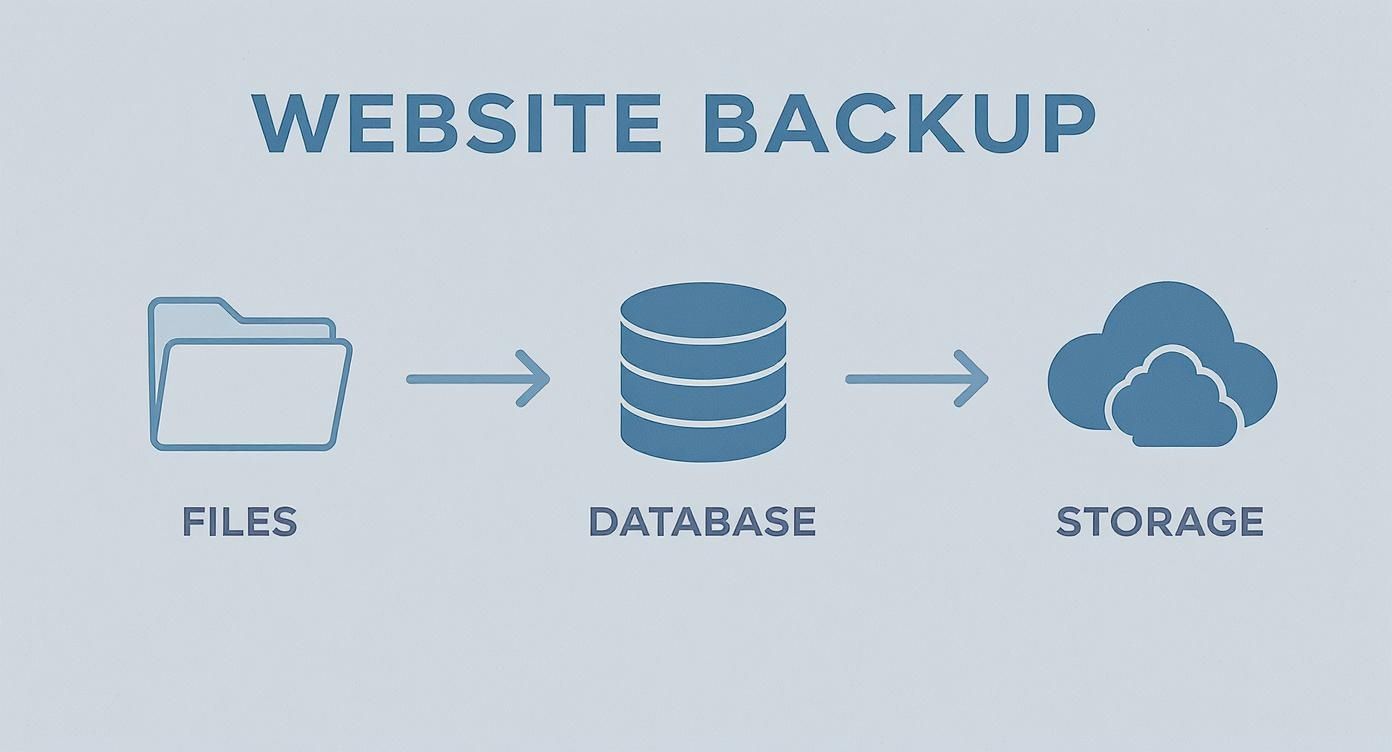
As you can see, it's a two-pronged attack. You secure both components, then transfer them to their new home.
There are a few ways to get this done, each with its own quirks. Some hosting providers offer automated tools, while others require a more hands-on approach.
Here's a quick comparison of the most common methods:
Migration Methods Comparison
| Method | Best For | Pros | Cons |
|---|---|---|---|
| Hosting Migration Service | Beginners or complex sites where you'd rather not risk it. | Hands-off, expert handling, minimal downtime. | Can be costly; less control over the process. |
| Manual FTP/SFTP & phpMyAdmin | DIY enthusiasts and smaller sites; provides full control. | You learn the process inside and out; it's free. | Time-consuming, higher risk of errors, slow for large sites. |
| Migration Plugins (e.g., All-in-One WP Migration) | WordPress users looking for a streamlined, user-friendly process. | Often very simple (one-click), bundles files and database. | Free versions may have size limits; premium plugins have a cost. |
While plugins and services are great, we're focusing on the manual method here. It gives you the best understanding of how your site actually works.
Getting Your Files to the New Server
First things first, let's get that compressed .zip archive of your site onto the new server. Most hosts provide a control panel like cPanel, which makes this part pretty painless.
Just log into your new host's cPanel and find the File Manager. Head straight for the root directory, which is almost always a folder named public_html. This is your website's home base. Upload your .zip file here.
Once the upload is finished, select the file and use the "Extract" function. This will unpack all your website’s folders and files right where they need to be.
A Quick Pro-Tip: Uploading one big
.zipfile and extracting it on the server is dramatically faster than uploading thousands of tiny files one-by-one with an FTP client. For a large site, this simple trick can save you hours of waiting.
Setting Up the New Database
With your files in place, you have the skeleton of your website. Now it needs its brain: the database. This is a two-step dance: first, you create an empty database, and then you fill it with the backup you made earlier.
Creating an Empty Database
In your new cPanel, look for an icon called MySQL Database Wizard. It's designed to walk you through this process.
- Name the Database: First, give your new database a name. Something unique is a good idea.
- Create a Database User: Next, you'll create a user for this database. Be sure to generate a very strong password and copy it somewhere safe—you'll need it in just a minute.
- Assign Privileges: The final step is to give your new user "All Privileges" on the new database. This allows the user to make changes, which is critical for your CMS to function properly.
Don't close this screen without jotting down the database name, the username, and that strong password.
Importing Your Data
Now it's time to bring your content over. Back on the cPanel dashboard, open the phpMyAdmin tool.
On the left-hand sidebar, click the name of the empty database you just created. Then, find and click the "Import" tab at the top. Here, you'll choose your .sql backup file, leave all the default settings as they are, and hit "Go."
If you have a large database, this can take a few minutes. Just let it run until you see a success message.
Connecting the Dots: Linking Files and Database
You're on the home stretch! Your files are uploaded, and your database is full of content. But they’re not communicating yet. The final technical step is to tell your website's configuration file about the new database.
If you’re running WordPress, this critical file is wp-config.php. You'll find it in the root directory (public_html) using the File Manager. Open it up, and look for these lines of code:
define( 'DB_NAME', 'old_database_name' );define( 'DB_USER', 'old_database_user' );define( 'DB_PASSWORD', 'old_database_password' );define( 'DB_HOST', 'localhost' );
Simply replace the old, placeholder values with the new database name, username, and password you created moments ago. The DB_HOST is typically 'localhost', but it's always smart to double-check your new host's documentation just in case.
Once you save the changes to that file, you’ve done it. Your website's files are now officially connected to their database on the new server. For more specifics on this process, especially for WordPress, our guide on migrating a WordPress website dives even deeper.
Updating Your DNS and Going Live
This is it—the moment of truth. After all the prep work, backups, and file transfers, it's finally time to flip the switch and point your domain name to its new home. This last big step involves updating your DNS, which is what officially makes your site live on the new server.
Think of the Domain Name System (DNS) as the internet's phonebook. When someone types yourwebsite.com into their browser, DNS tells them which server to call. Right now, it's still pointing to your old host. We just need to update that entry with the new address.
Getting this right is crucial for a seamless transition, ensuring your visitors land in the right place without a hitch.
Most domain registrars, like GoDaddy shown here, have a straightforward dashboard for managing your domains. You’ll be looking for a section labeled "DNS" or "Manage Nameservers."
Finding and Updating Your Nameservers
Your new hosting company will provide you with at least two nameservers. They typically look something like ns1.newhost.com and ns2.newhost.com. You can usually find these in your welcome email or on your hosting dashboard. If you're having trouble locating them, just send a quick message to their support team.
Once you have the new nameserver addresses, the rest is pretty simple:
- Log in to your domain registrar’s account. Remember, this is where you bought your domain name (like Namecheap or Google Domains), which might not be the same place as your old host.
- Find the domain management area and look for the option to edit or change your nameservers.
- Carefully replace the old nameservers with the new ones you just got.
- Save your changes. You'll likely see a warning that the update can take some time to go into effect.
And that's it! You've officially told the internet where your website's new address is.
What to Expect During DNS Propagation
Updating your nameservers isn't like flipping a light switch; the change isn't instant. It has to spread across the internet in a process called DNS propagation.
This process can take anywhere from a few minutes up to 48 hours, though in my experience, it's usually on the faster side. During this window, some visitors will see the new site while others might still be directed to the old one. This is totally normal.
There’s nothing you can do to speed this part up, so this is a great time to take a break. The hardest part is often resisting the urge to hit refresh every five minutes!
Don't Skip the Post-Launch Checks
Once you can consistently see the new site on your own computer, you’re almost done. A few final checks are absolutely essential to make sure everything is working perfectly before you pop the champagne. These few minutes can save you from some major headaches down the road.
Here's a quick final checklist:
- Confirm SSL is Active: Is the little padlock icon showing in your browser's address bar? Your site must be secure. If not, your new host probably has a one-click option to install a free Let’s Encrypt SSL certificate. Get it done.
- Test Every Form: Go through all your contact forms, newsletter signups, and especially your checkout process. Fill them out and make sure the submissions are actually coming through.
- Click Through Key Links: Navigate your site like a first-time visitor. Test the main menu, footer links, and a few internal links on your most popular pages.
- Look for Broken Images: A quick scroll through your homepage and other important pages will tell you if all your images made the trip successfully.
Running through these final checks ensures your migration ends on a high note, leaving you with a fully functional, secure website ready for your visitors.
Post-Migration SEO Health Checks
Getting your site live on the new server is a huge milestone, but don't pop the champagne just yet. The next few weeks are where you protect all the SEO value you've spent years building. Honestly, skipping these final checks is one of the most common—and costly—mistakes I see people make.
Think of it like post-op recovery. The surgery went well, but now you need to monitor the patient's vitals to make sure everything is healing correctly.
Keep a Close Eye on Search Console for Errors
Your first stop should always be Google Search Console. This is your direct line to Google, and it's where any red flags will pop up first.
Head straight to the Coverage report. Don't be alarmed if you see a temporary spike in errors right after a migration; that's normal as Google figures out your site's new address. What you need to watch for are specific patterns:
- A flood of 404s (Not Found): This means Google is hitting dead ends. If these are pages that should exist, you have a problem. If they're old pages, you need to make sure your redirects are working.
- Server errors (5xx): A sudden jump here is an emergency. It points to a problem with your new server's configuration and needs to be fixed immediately.
I always recommend checking this report daily for the first week. It lets you get ahead of problems before they have a chance to hurt your rankings.
Confirm Your Pages Are Being Indexed
While you're still in Search Console, you need to make sure Google can actually see and index your pages from the new location. Grab your homepage URL and a few other important page URLs and pop them into the URL Inspection tool. This will show you exactly how Google sees them.
Once you’ve confirmed the key pages look good, it’s time to hand Google a new map.
Submitting an updated XML sitemap is like giving Google a fresh set of blueprints. It encourages them to crawl everything more quickly and helps them find all your important content at its new home.
This one simple step can really speed up the re-indexing process.
Double-Check Your Redirects to Keep Your Link Juice
If you changed any part of your URL structure during the move, 301 redirects are absolutely essential. A 301 tells search engines that a page has moved permanently, and it passes most of the ranking power from the old URL to the new one.
Forgetting this is an SEO catastrophe waiting to happen. You’ll end up with broken backlinks and a serious drop in ranking authority. You can get into the nitty-gritty of how to implement 301 redirects using .htaccess with our technical guide. Make a list of your most important pages and manually test those redirects.
It's also important to be patient. I've seen countless migrations, and it typically takes anywhere from 4 to 12 weeks for search performance to level out. A temporary dip is normal, and some sites may even need three months to fully recover their rankings. You can find more data on the SEO impact of website migration on candidsky.com.
Audit Your Performance and Track Your Rankings
Okay, last step. Did the new host deliver on its speed promises? Run your site through Google PageSpeed Insights again. Compare the new scores to the baseline numbers you took before the migration. You should be seeing a nice improvement.
Now, just watch your numbers. Keep an eye on your organic traffic in Google Analytics and your keyword positions in whatever rank tracker you use. A small dip is fine, but if you see a steep, sustained drop, you know it’s time to go back through these health checks and find the culprit. This ongoing monitoring is your best defense against any long-term SEO damage.
Answering Your Top Website Migration Questions
Even with a perfect plan in hand, it's completely normal to feel a bit of anxiety about moving your website. It’s a significant technical project, after all. Let's walk through some of the most common questions and concerns that come up.
Getting these answers straight in your head beforehand can transform a nerve-wracking task into a smooth, controlled project.
Will My Website Go Down During the Move?
This is the big one, the question on everyone's mind. And the good news? With a smart approach, you can pull this off with minimal to zero downtime.
The trick is to do all the heavy lifting behind the scenes. Your current site stays live and untouched while you get a complete, working copy of it running on the new host. You only switch your domain’s DNS to point to the new server after you’ve tested everything and know it works perfectly.
The only "gray area" is DNS propagation, which can take a few hours. During this window, some visitors might see the old site while others see the new one, but your website never actually goes "offline."
What's Going to Happen to My SEO?
When handled correctly, moving your site to a new host should have a neutral or even positive effect on your SEO. You might see a temporary, small dip in traffic as search engines index the new server location, but it almost always bounces back quickly.
Here’s how to protect your hard-earned rankings:
- Keep your URLs exactly the same. If a change is unavoidable, you absolutely must set up 301 redirects from the old URLs to the new ones.
- As soon as you're live on the new host, submit your updated XML sitemap in Google Search Console.
- Keep a close eye on crawl errors in Search Console for the first week or so.
Often, moving to a faster, more stable server can give your SEO a real boost over time. Site speed and reliability are huge factors for Google.
When Is the Best Time to Migrate a Website?
Simple: do it when your traffic is at its lowest. For most businesses, that means late at night or on a weekend. Dig into your website analytics to pinpoint your quietest hours.
Choosing an off-peak time gives you breathing room. If you hit a snag, you can troubleshoot it without impacting a flood of customers or visitors. It's all about minimizing risk.
An online store, for instance, would be crazy to migrate during Black Friday. But a B2B company might find that a Friday night is the perfect, quiet window to make the switch.
What if Something Goes Horribly Wrong?
This is exactly why having a recent, reliable backup is non-negotiable. If you switch the DNS and discover a catastrophic problem on the new server, your emergency plan is simple: point the DNS right back to your old host.
Since you never took the original site down, it can be back online for everyone in a flash. This buys you a stress-free environment to figure out what went wrong on the new server, fix it, and then try the final cutover again.
Navigating a website migration can feel overwhelming, but you don't have to tackle it alone. The expert team at OneNine takes care of the entire process, from secure backups to post-launch SEO checks, guaranteeing a smooth transition without the headaches. Let us handle the technical side of things so you can stay focused on your business. Learn more about our website management services.


