

Moving a WordPress site isn't just about shuffling some files around; you're relocating your entire digital presence. It involves migrating your website's files—all the themes, plugins, and images—and its database, which is the brain of the operation, holding all your content and settings.
You can tackle this in a few ways: use a handy migration plugin, get your hands dirty with a manual transfer, or let your new hosting company take care of everything. They all get you to the same destination, but the path you choose depends on your comfort level with the technical details.
Why and When to Change Your WordPress Host
Switching your WordPress host is a big decision, but it's rarely just about technology. It's a strategic business move. Sticking with a slow, unreliable host can quietly sabotage your success, hurting everything from sales to your brand's reputation. Knowing when to make the leap is key.
Poor performance is usually the final straw. When your pages take forever to load, you're not just annoying visitors—you're losing them. We’ve all seen the data: even a one-second delay can send conversion rates tumbling. For an online store, that’s money walking right out the door, especially during a big sale.
Common Signs It Is Time for a New Host
Beyond sluggish speeds, other red flags signal that your hosting relationship has run its course. A great hosting partner should be an invisible force for good, not a constant headache.
Here are a few unmistakable signs that you've outgrown your current host:
- Frequent Downtime: Is your site constantly offline? Unreliability doesn't just look bad to customers; it tells search engines your site isn't dependable, which can hammer your rankings.
- Customer Support Is MIA: When things break (and they will), you need help now. If you're waiting hours or even days for a support ticket response, that's a massive problem.
- Sketchy Security: A good host is proactive about security. If your site has been hacked, or if they don't even offer basics like a free SSL certificate, your business and your customers are at risk.
- Hitting a Wall with Resources: Your website traffic is growing—that's great! But if your host can't keep up and your site slows to a crawl during busy periods, they're holding you back.
A great hosting provider grows with you. If you find yourself constantly bumping up against resource limits or facing crazy fees for minor upgrades, their business model probably isn't built for your long-term success.
Ultimately, it all boils down to this: is your host helping you succeed or standing in your way? If you spend more time troubleshooting your hosting than you do running your business, it’s definitely time to find a better home for your website.
Choosing Your WordPress Migration Method
So, you’ve decided to transfer your WordPress site to a new host. This is a big step, and right now you're at a critical fork in the road. There’s no single "best" way to do this; the right path really depends on your technical comfort level, budget, and how much time you can personally dedicate to the project.
Think of it like moving to a new house. You could rent a truck and do all the heavy lifting yourself, hire a moving crew to handle the big stuff, or opt for a full-service company that packs every box for you. Each option gets your stuff from point A to point B, but the experience and effort involved are worlds apart.
Your goal is to pick the method that causes the least amount of stress and disruption. Let’s walk through the three main approaches so you can make a smart choice for your business.
This chart can help you visualize how common hosting problems often point toward a specific migration solution.
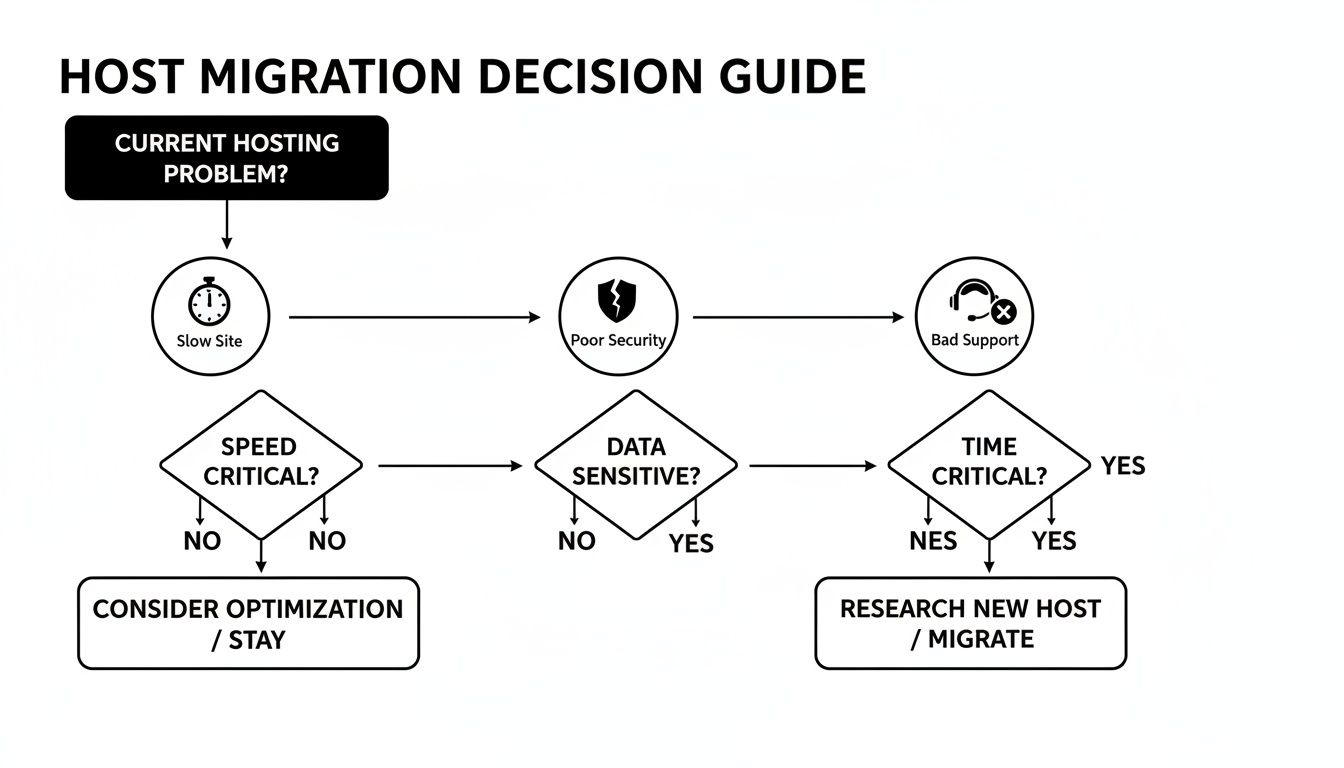
As you can see, the why behind your move—whether it's lagging performance, security scares, or non-existent support—can definitely influence which method will get you to a better place faster.
Comparing WordPress Migration Methods
To make things even clearer, let's put these three options side-by-side. This table breaks down the key differences in terms of skill, cost, and risk.
| Method | Best For | Technical Skill Required | Cost | Potential Downtime |
|---|---|---|---|---|
| Manual | Developers, tech-savvy users, and highly complex sites. | High | Free (your time) | High risk if mistakes are made. |
| Plugin | Most business owners, marketers, and non-developers. | Low | Free to ~$99 | Low; most plugins manage this well. |
| Host-Assisted | Anyone wanting a completely hands-off, worry-free process. | None | Free to ~$150+ | Minimal; handled by professionals. |
Looking at the comparison, it’s clear there’s a trade-off between control, cost, and convenience. The best choice is the one that aligns with your team's skills and your project's urgency.
The Manual Migration Route
This is the classic DIY approach. You’ll be rolling up your sleeves and using tools like an FTP client (I use FileZilla) to download all your website files and phpMyAdmin to export your database. Then, you simply reverse the process on the new server and manually edit a critical file to connect everything.
Going manual gives you total control. You see every single step and know exactly what's happening, which can be reassuring if you’re technically inclined. The biggest perk? It’s completely free, costing you nothing but your time.
However, the risk is significant. One tiny typo in your wp-config.php file or a botched database import can bring your entire site down. It’s not for the faint of heart.
- Who it’s for: Developers, IT-savvy business owners, or anyone managing a massive or heavily customized site where plugins might struggle.
- The big catch: You need a solid grasp of how file servers and databases work. I absolutely do not recommend this for beginners.
The Plugin-Based Migration Method
For most business owners, this is the perfect middle ground. A good migration plugin—like All-in-One WP Migration or Duplicator—is a game-changer. It bundles your entire website (themes, plugins, media, and database) into a single, tidy package.
You just set up a fresh WordPress install on your new host, add the same plugin, and upload that package file. It’s that straightforward. The plugin automatically handles the tricky database updates, which is where most manual moves go wrong. While many have fantastic free versions, you might need a paid extension if your site is particularly large.
For a deeper dive into the preparation steps, our comprehensive website migration checklist is a great resource to use alongside your plugin.
The Host-Assisted Migration Service
Finally, we have the "let someone else handle it" option. Many hosting companies, especially managed WordPress hosts, offer a free or low-cost migration service to win your business. You just give them the keys to your old hosting account, and their team of experts takes care of the entire transfer.
This is, by far, the easiest and safest route. You don't have to touch a single file. The host's team has done this thousands of times and knows how to sidestep all the common traps. The only real downside can be the timeline; depending on their workload, it might take 24-48 hours to complete.
If your top priority is a smooth, stress-free transition without lifting a finger, this is the way to go.
The Easiest Way: Using a Migration Plugin
Let’s be honest—most business owners and marketing leaders have zero interest in messing with website files and databases. That's exactly why using a dedicated migration plugin is the go-to method for moving a WordPress site. It strikes the perfect balance between control and simplicity, so you don't need a degree in computer science to get the job done right.
Think of it like hiring professional movers for your house. A good migration plugin packs up everything—your pages, blog posts, images, themes, and even user comments—into a single, tidy package. This approach completely sidesteps the biggest headache of manual moves: accidentally leaving a critical file behind or messing up the database connection.
The beauty of this method is its reliability. You create one package on your old site, set up a fresh WordPress install on your new host, and then simply upload and unpack your site. The plugin does all the heavy lifting in the background, like running a find-and-replace on your database to make sure all your internal links and media paths point to the new server.
First Things First: Prep Your Site for the Move
Before you even touch a plugin, a little prep work is essential. A smooth migration is won or lost in the preparation. Rushing this part is almost always where things go wrong.
Start by making a completely separate backup of your website. Use a tool like UpdraftPlus or your host's own backup feature. Yes, the migration plugin will create its own package, but this independent backup is your ultimate safety net. It's the old "measure twice, cut once" rule applied to your digital home.
Next, do a little housekeeping:
- Update Everything: Make sure WordPress core, all your themes, and every plugin are running on the latest version. This helps you avoid compatibility headaches on the new server.
- Tidy Up: Delete any themes and plugins you aren't using. Clear out old post revisions and empty the trash. A lighter site is a faster site to pack up and move.
- Check PHP Versions: This is a quick but critical step. Confirm the PHP version on your new host. If your old host is on an older version (like PHP 7.4) and the new one is on a modern one (like PHP 8.2), some older plugins might break. A quick message to your new host's support team can clear this up in minutes.
A Quick Tip from Experience: Always plan your migration for a time when your site traffic is at its lowest. A late weeknight or a weekend is perfect. While plugin migrations are designed to be seamless, this gives you a buffer so that a minor hiccup doesn’t disrupt your visitors.
With your site backed up and tidied, you're ready to get started.
Using All-in-One WP Migration
For this walkthrough, we’ll use All-in-One WP Migration. It's one of the most popular and straightforward tools out there, and the free version handles most small-to-medium business sites without a problem.
First, you’ll need to install the plugin on your current (old) website. If you’ve never done this before, our guide on how to add plugins in WordPress will show you how.
Once activated, you'll see a new "All-in-One WP Migration" tab in your WordPress dashboard menu.
The plugin's interface is clean and simple, pointing you right to the export and import functions without any confusing extras.
Creating the Migration Package
With the plugin installed on your old site, creating the package is a breeze.
- In your WordPress dashboard, go to All-in-One WP Migration > Export.
- Click the big green “Export To” button.
- From the dropdown menu that appears, just choose "File".
The plugin will start gathering up your entire site and compressing it into a single file with a .wpress extension. Depending on how large your site is, this can take anywhere from a few minutes to an hour or more. Once it's done, you'll get a prompt to download the file to your computer. Hang onto this file—it's literally your entire website in a box.
Importing Your Site to Its New Home
Now for the fun part: bringing your site back online at its new address.
First, you'll need a blank canvas. Log in to your new hosting account and use their one-click installer to set up a fresh, default WordPress site. Don't bother with any themes or settings here, as everything is about to be completely overwritten.
Next, log in to this brand-new WordPress dashboard and install the exact same All-in-One WP Migration plugin. This time, you'll go to All-in-One WP Migration > Import.
You’ll see a simple box where you can drag and drop your .wpress file or click to select it from your computer. Go ahead and upload the package you downloaded earlier. The plugin will give you one final warning, letting you know that this process will overwrite the new site's database, files, and media. Confirm you want to proceed.
After the upload and unpacking process finishes, the plugin will prompt you to re-save your permalinks. This is a crucial final step. Just follow the on-screen instructions—it just involves clicking a button twice—and your site will be fully restored on its new host, looking and working just like it did before.
The reality is, a successful migration is 90% planning and 10% execution. Hurried attempts are the ones that fail. The two most common culprits are database connection errors and hitting server upload limits because the site package is too large. For a small blog, a plugin migration can be done in 30 minutes, while a complex site might take longer.
How to Manually Transfer Your WordPress Site
While plugins are often the go-to for their simplicity, doing a manual migration puts you in the pilot’s seat. This is the professional standard, especially for complex sites or for developers who want to control every single detail of the move.
It might sound a bit technical, but the process is quite logical. It really boils down to two big jobs: moving your files and migrating your database. This hands-on method ensures nothing gets lost in translation by an automated tool, making it the most reliable way to handle a transfer of a WordPress site to a new host, particularly if you have a ton of files or a unique database setup.
Moving Your Website Files with FTP
First up, let's get your website's files from point A to point B. This includes everything from the WordPress core files and themes to your plugins and all the images you've uploaded over the years. The classic tool for this is an FTP (File Transfer Protocol) client. Think of popular options like FileZilla or Cyberduck.
An FTP client is basically a bridge between your computer and your web servers. It lets you download all the files from your old host to your desktop and then upload them to your new one. You'll need FTP credentials for both accounts, which you can typically find in your hosting control panel (like cPanel) or by simply asking your host’s support team.
The process itself is straightforward, but it does require some patience.
- Log in to your old host. Fire up your FTP client and connect using your old server's credentials.
- Download all your files. Go to your site's root directory—this is usually named
public_htmlorwww—and download that entire folder to your computer. - Connect to the new host. Once the download is done, disconnect from the old server and log in to the new one with its FTP details.
- Upload everything. Drag the folder you just downloaded from your computer into the root directory on your new server.
This file transfer can take a while, especially if your site is media-heavy. It’s a perfect task to kick off and let run in the background while you grab a coffee.
Exporting and Importing the Database
With your files in transit, it’s time to tackle the brain of your website: the database. This is where WordPress stores every post, page, user, and setting. Precision here is key.
The tool for this job is usually phpMyAdmin, a common feature in most hosting control panels that gives you direct access to your databases.
Start by logging into your old host's control panel and opening phpMyAdmin. You'll see a list of databases on the left; select the one for your WordPress site. From there, click the "Export" tab. The "Quick" export method works just fine for most sites. This will package your entire database into a single .sql file for you to download.
Your database file is the heart of your website. When moving it, following best practices for secure data transfer is non-negotiable to protect your site and its data.
Now, you'll basically reverse the process on the new host. But first, you need a new, empty database to put everything into. Look for a tool like the "MySQL Database Wizard" in your new host’s control panel. This will walk you through creating a new database name, user, and a strong password. Write these down! You'll need them in a minute.
With your empty database ready, open phpMyAdmin on the new host. Select your new database, click the "Import" tab, and then upload the .sql file you downloaded earlier.
The Most Critical Step: Editing wp-config.php
Okay, your files and database are now sitting on the new server, but they're not speaking to each other yet. This final, and most crucial, step is to edit the wp-config.php file to make that connection. This file is the instruction manual that tells WordPress where to find its database.
Using your FTP client or your new host’s file manager, find wp-config.php in your site's root directory. Open it up and look for these lines:
define( 'DB_NAME', 'old_database_name' );
define( 'DB_USER', 'old_database_user' );
define( 'DB_PASSWORD', 'old_password' );
define( 'DB_HOST', 'localhost' );
You have to carefully replace the old, placeholder values with the new database name, username, and password you just created. The DB_HOST is almost always 'localhost', but a few hosts use something different. If you're not sure, a quick chat with their support will clear it up.
Once you save those changes, your site should be up and running on the new server. Be extra careful here—90% of manual migration errors happen right in this file. A tiny typo in the password or database name will trigger that dreaded "Error Establishing a Database Connection" message. Double-check your work, and your manual transfer will be a success.
Your Post-Migration Checklist for a Flawless Launch
You’ve wrestled with the files and databases, and your site is now sitting on its shiny new server. That’s a huge step, but don’t pop the champagne just yet. The work to transfer your WordPress site to a new host isn't quite over.
Think of this next phase as the final walkthrough of a new house. You need to check the plumbing, flip all the switches, and make sure everything is exactly where it should be. Rushing these final checks is a classic mistake that can lead to broken links, scary security warnings, or even lost sales. Let's make sure your launch is a success.
Pointing Your Domain to the New Server
Right now, your domain name—your .com address—is still telling the world to look at your old host. The very last step to "go live" is to update your Domain Name System (DNS) records. DNS is basically the internet's address book, and you need to give it your site's new address.
Your new host will provide you with their nameservers. All you have to do is log into your domain registrar (the place where you bought the domain, like GoDaddy or Namecheap) and replace the old nameservers with the new ones.
Once you hit save, DNS propagation kicks in. This is just the process of servers worldwide updating their records. It can take anywhere from 30 minutes to 48 hours, though it's usually much quicker these days. During this time, some of your visitors might see the old site while others see the new one, which is perfectly normal.
Securing Your Site with a New SSL Certificate
Security is not optional. An SSL certificate is what gives you the "https" and the little padlock icon in the browser bar, encrypting the connection between your site and your visitors. Your old SSL certificate is tied to your old host, so you'll need to install a fresh one right away.
Thankfully, most quality hosts offer a free SSL from Let's Encrypt and make it a simple one-click install from your control panel. If you run into any trouble, their support team can usually sort it out in minutes. Don't put this off—without it, browsers will loudly announce that your site is "Not Secure," which is the fastest way to lose a visitor's trust.
Your Final Testing and Verification Plan
With your domain pointing to the new server and your SSL certificate active, it's time to play detective. Don't just look at the homepage and call it a day. You need to comb through your site as if you were a brand new customer.
Here’s a simple but effective plan to catch any lingering issues:
- Hunt for Broken Links: Use a free tool to crawl your site for any 404 errors. Fixing these is crucial for both your visitors and your SEO.
- Test Every Single Form: Fill out your contact forms, newsletter signups, and quote requests. Check that the submissions actually land in your inbox.
- Run a Test Purchase: If you have an e-commerce store, this is non-negotiable. Go through the entire checkout process, from adding a product to the cart to completing a payment.
- Check Your Media: Click through your key pages and blog posts. Are all the images, videos, and PDFs loading correctly?
A smooth migration isn't just a technical win; it's a financial one. A standard WordPress site can cost around $2,510 annually to operate, and complex migrations can run from $3,000 to $8,000. But here's the payoff: moving a site with a poor Core Web Vitals score to one that consistently hits 95%+ can boost conversions by 7-20%. Suddenly, that migration cost looks like a smart investment.
Once your WordPress site is settled into its new home, the work doesn't stop. You'll want to improve SEO for lasting growth to make the most of your new, faster platform. For a deeper look at this final phase, our website launch checklist covers all the post-launch checks you'll need.
Answering Your WordPress Migration Questions
Moving your WordPress site is a big deal, and it's completely normal to have a few questions swirling around. Let's tackle the most common ones we hear from clients so you can feel confident about the entire process.
Will My Website Go Down During The Transfer?
With a bit of smart planning, you can pull this off with zero noticeable downtime. The trick is to keep your old site up and running while you get everything copied over and tested on the new server.
The only real blip on the radar is during what's called DNS propagation. This is when the internet is updating to point your domain name to the new host. It can take anywhere from a few minutes to a couple of hours, but if you time the switch for a low-traffic period—say, late on a Tuesday night—your visitors will be none the wiser.
How Does Moving My Site Affect SEO?
If you do it right, a migration shouldn't harm your SEO at all. In fact, switching to a better, faster host can actually give your search rankings a nice boost over time. The most important thing is to make sure every URL, piece of content, and internal link makes it over to the new host perfectly intact.
Once you've moved, I always recommend running a broken link checker and resubmitting your sitemap to Google Search Console. It's a simple step that helps you catch any potential issues. The biggest SEO killers—long periods of downtime and broken pages—are entirely avoidable with a good post-migration checklist.
It’s worth remembering just how massive the WordPress ecosystem is. As of 2026, WordPress powers a staggering 43.5% of all websites, which adds up to over 522 million live sites. This isn't just a fun fact; it means the migration process is a well-oiled machine. Hosts have seen it all, and countless tools are built specifically for this job. You can dig into more WordPress insights and statistics on Hostinger.com to see the full picture.
What If The Migration Fails or Something Breaks?
This is where your prep work really shines. Your ultimate safety net is a complete, fresh backup of your site taken right before you start anything. If things go sideways on the new host, you can simply restore that backup on your old server and you're back in business.
Here's the most critical piece of advice: do not cancel your old hosting plan immediately. Give it at least a week. This gives you time to make absolutely sure the new site is stable and working as expected, providing a reliable fallback just in case.
At OneNine, we take the stress out of website management, including complex migrations. If you want a partner to handle every detail of your site's transfer and ongoing success, we're here to help. Learn more about our website development and management services.


