

If you're ready to take your WordPress site from a basic template to a powerful, customized tool, learning how to install plugins is the first and most important step. It's surprisingly straightforward. You can either search for free plugins right from your WordPress dashboard or upload a premium one as a .zip file. Either way, it only takes a few clicks.
Why Plugins Are the Heart of Your WordPress Site

Think of a fresh WordPress installation like a blank canvas. It has the essential structure of a website, but it's missing the specific features that will help you achieve your goals. This is where plugins come in. They are the tools—the brushes and the paint—that bring your vision to life.
Plugins are essentially small software add-ons that introduce new functions or expand existing ones, all without you ever needing to write a single line of code. They are the fundamental building blocks that can turn a simple blog into a full-blown, feature-rich platform. So, learning how to install plugins isn't just a technical skill; it's your key to unlocking true customization. For a deeper dive, check out our guide on https://onenine.com/what-is-plugin-in-website/.
Unlocking Your Website's Potential
The real magic of WordPress is its massive ecosystem of plugins. With these tools, you can add complex features that, not too long ago, would have required hiring an entire development team. This incredible flexibility is exactly why WordPress has become so popular.
This plugin-first approach has fueled WordPress's staggering growth, which now powers an incredible 43.2% of all websites on the internet. With over 70,000 plugins available in the official directory alone, you can add almost any feature you can imagine.
Just think about the possibilities. With the right plugins, you can:
- Launch a Store: A plugin like WooCommerce can instantly transform your site into a complete online store with product pages, a shopping cart, and secure payment processing.
- Dominate SEO: Tools like Yoast SEO or Rank Math act as your personal SEO coach, guiding you to optimize your content so you can rank higher in Google searches.
- Lock Down Security: A security plugin like Wordfence adds a powerful firewall and malware scanner to protect your site from hackers and other threats.
A website without plugins is like a smartphone without apps. It can handle the basics, but you're missing out on the tools that make it truly powerful, efficient, and perfectly suited to your needs.
Plugins are what allow you to build sophisticated systems, like when you choose the best e-commerce platform for your online store. An e-commerce plugin doesn't just add a "buy now" button; it weaves together inventory management, shipping calculators, and customer accounts to create a seamless retail experience from the ground up. This ability to add enterprise-grade features is what makes WordPress the go-to choice for millions.
The Easiest Method: Installing a Plugin from the WordPress Dashboard
For most people, the simplest and most common way to install a plugin is directly through the WordPress admin area. Honestly, this is how you'll probably handle 99% of your plugin installations. It gives you instant, searchable access to the entire official WordPress plugin directory.
Let’s imagine a real-world scenario: your site feels sluggish, and you’ve heard a caching plugin could give it a serious speed boost. We'll use that goal to find and install the right tool without ever leaving your dashboard.
This built-in search feature is a huge part of what makes WordPress so powerful. The ecosystem is massive, with over 60,000 free plugins available. To give you some perspective, plugins like Yoast SEO have been installed on millions of sites, all thanks to this straightforward process.
Finding and Vetting the Right Plugin
First things first, log into your WordPress dashboard. Look over to the left-hand menu, find "Plugins," and click "Add New Plugin." This screen is your gateway to thousands of tools.
You'll see a search bar at the top right. This is your starting point. Since we're on the hunt for something to speed up the site, typing in a term like "caching" or "website speed" will pull up a bunch of relevant options.
The search results page is where you'll do your detective work to find a quality plugin.
This screen isn't just a list—it's your first line of defense against installing something outdated, unsupported, or just plain broken. Before you click anything, take a moment to evaluate the details on each plugin's card.
Here are the four key things I always check:
- Active Installations: How many other websites are using this plugin? A high number, like tens of thousands or even millions, is a great sign of trust and reliability.
- Star Rating: The five-star rating gives you a quick read on what other users think. I generally look for plugins with a high average rating from a decent number of reviewers.
- Last Updated: This is critical. A recent update shows the developer is actively maintaining the plugin, fixing bugs, and patching security issues. If it hasn't been updated in a year, I'd be very cautious.
- Compatibility: You’ll see a little note confirming if it’s "Compatible with your version of WordPress." Installing an incompatible plugin is a recipe for errors or, in the worst case, a crashed site.
Think of these metrics like a plugin's resume. High active installations, a great star rating, and recent updates tell you this candidate is reliable, well-liked, and actively maintained.
The Two-Click Install and Activate Process
Once you've done your homework and picked a winner, the rest is easy. Just click the "Install Now" button. Behind the scenes, WordPress grabs all the necessary files from the directory and places them on your server. It usually just takes a few seconds.
Now, here’s a step that trips up a lot of beginners. After the installation finishes, the button will change to a blue "Activate" button. Clicking "Install Now" only puts the files on your site; it doesn't actually turn the plugin on. It’s sitting there, dormant, waiting for your command.
Go ahead and click "Activate."
And that's it! The plugin is now live and running. In our caching example, it would immediately start working its magic to speed things up. Most plugins will add a new menu item to your main dashboard or nest their options under the "Settings" or "Tools" tabs. From there, you can dive in and configure everything to your liking. You’ve just successfully installed your first plugin from the WordPress dashboard.
How to Manually Upload a Plugin ZIP File
Sooner or later, you'll run into a fantastic plugin that isn't in the official WordPress directory. This is especially true for premium or highly specialized tools you buy from developers or marketplaces like CodeCanyon. When you purchase one of these, you'll usually get a .zip file to download. Knowing how to get that file onto your site is a must-have skill.
This manual upload method is the standard for almost every premium plugin out there—think powerful page builders, advanced e-commerce add-ons, or exclusive membership plugins. You buy it, you download it, and then you upload it yourself.
While the official directory has a staggering 59,000+ free plugins, the premium market is massive, with well over 10,000 more. It's telling that only about 30 new free plugins from the past three years have hit 100,000 active installs. This points to a huge demand for specialized, paid solutions that you'll have to install using this exact method. If you're curious, you can dig into more WordPress statistics to see just how big this ecosystem is.
The Upload Process in Your Dashboard
Getting your new plugin onto your site is actually pretty simple. You don't need any special tools—it's all handled right inside your WordPress admin area.
First, head to your dashboard and go to Plugins > Add New Plugin. You'll land on the same screen you use to search for free plugins. But this time, ignore the search bar. Instead, look for the "Upload Plugin" button at the top of the page and give it a click.
Clicking that button will reveal a simple file upload form. Hit "Choose File," find the plugin .zip file you downloaded to your computer, and select it. Then, click "Install Now."
WordPress takes over from there, unpacking the zip file and putting everything in the right place on your server. In a moment, you’ll see a success message.
Don't forget this last step! Installing the plugin just puts the files on your site. It doesn't actually turn it on. You have to click the blue "Activate Plugin" button to get it working.
Avoiding Common Upload Mistakes
The number one mistake I see people make is trying to upload the wrong file. This happens all the time with plugins bought from big marketplaces. Often, the file you download isn't just the plugin; it's a package that includes documentation, license files, and other extras, all bundled into one master .zip.
If you try to upload that main package, WordPress will throw an error, usually something like, "The package could not be installed. No valid plugins were found."
Here’s the simple fix:
- Unzip it first: Before you do anything in WordPress, unzip the file you downloaded on your own computer.
- Find the right file: Inside the folder you just unzipped, you'll find the actual plugin file. It’s usually named something obvious, like
plugin-name.zip. - Upload that one: Now, go back to your WordPress dashboard and upload that specific
.zipfile. Problem solved.
Another classic snag is hitting your server's file size limit, especially with bigger plugins. If you get an error message that says something like, "The uploaded file exceeds the upload_max_filesize directive," don't worry. This is a server setting, not a WordPress problem. Just shoot a quick message to your hosting provider and ask them to increase your upload limit. They deal with this all the time and can usually fix it for you in just a few minutes.
Going Pro: Installing Plugins with FTP or WP-CLI
While the WordPress dashboard is great for everyday use, sometimes you need to get your hands dirty. For developers, agency pros, or anyone facing a site-breaking issue, knowing how to install plugins with FTP or the command line is a non-negotiable skill.
These methods bypass the WordPress admin area completely, giving you a direct line to your site's files. It's your escape hatch.
Imagine the dreaded "white screen of death" has locked you out of your dashboard after a bad plugin update. The usual methods are useless. But with FTP, you can jump directly into your server, yank out the problem plugin, and bring your site back from the dead. It’s the ultimate manual override.
Method 3: Installing a Plugin with an FTP Client
FTP, or File Transfer Protocol, is just a way to manage your website's files directly on the server. Think of it like using Finder on a Mac or File Explorer on Windows, but for your web host.
To get started, you'll need two things:
- An FTP client: This is the software that connects your computer to the server. FileZilla is a fantastic free option, while Transmit is a popular premium choice for Mac users.
- Your FTP credentials: Your web host provides these. Look for the Host (server address), Username, Password, and Port (usually 21 for FTP or 22 for the more secure SFTP).
Once you connect, you'll see your website's file structure. Your mission is to navigate to the /wp-content/plugins/ folder. This is where all your plugins live.
Now, here’s the crucial part. Do not upload the .zip file. You have to unzip the plugin file on your computer first. This will create a new folder named after the plugin. It’s that unzipped folder you need to drag and drop into the /wp-content/plugins/ directory on your server.
After the upload finishes, pop back over to your WordPress dashboard. Head to the Plugins page, and you'll find your new plugin sitting there, waiting for you to click "Activate."
This decision tree helps visualize when you might choose a free plugin from the repository versus a premium one that could require a more hands-on installation method like FTP.
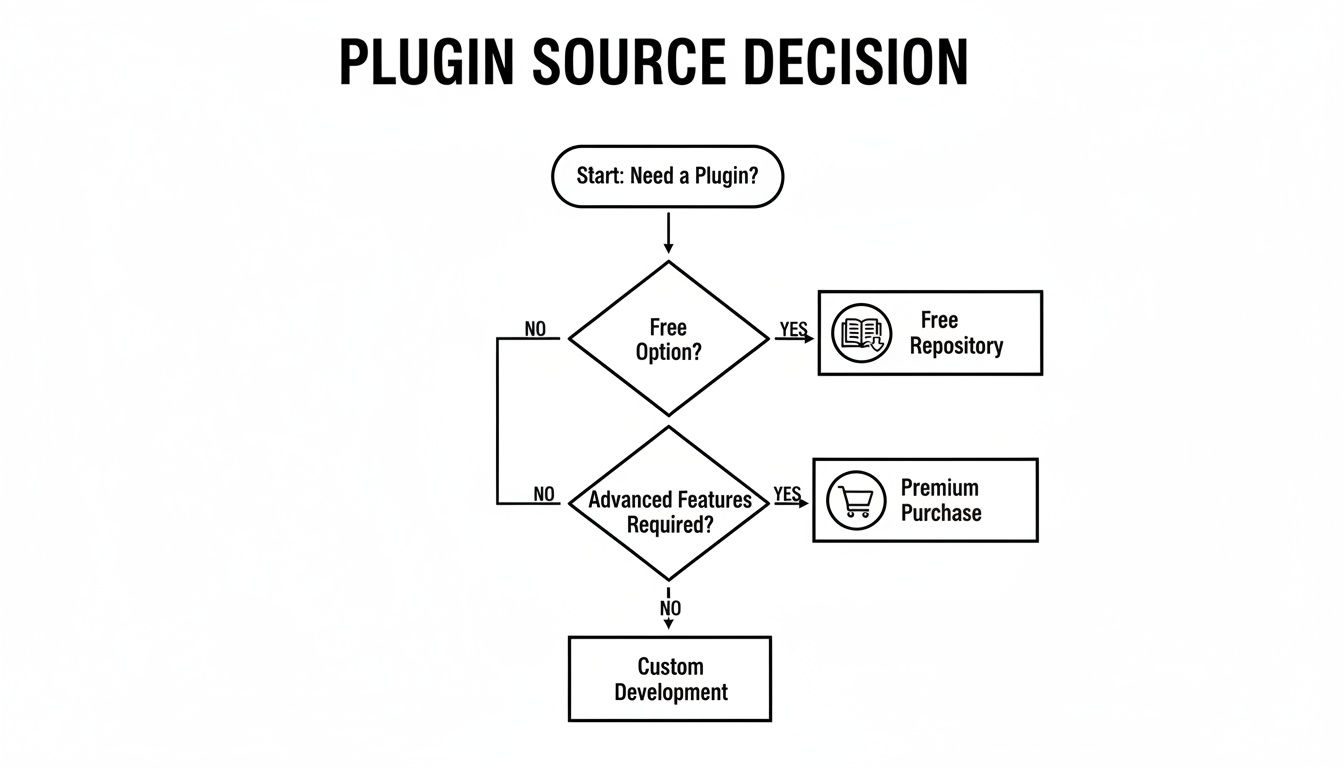
As you can see, the path for free plugins is typically straightforward, while premium or custom solutions often benefit from the control offered by FTP or other advanced techniques.
Method 4: Using the WordPress Command Line WP-CLI
For developers and sysadmins who live in the terminal, the WordPress Command Line Interface (WP-CLI) is the fastest, most powerful way to manage a WordPress site. It lets you run commands to control everything—plugins, themes, users, and more—without ever touching a graphical interface. It's fast, efficient, and perfect for automation.
To use it, you'll need SSH access to your server, which most quality hosts provide. Once you're connected, you can run complex operations with a single line of code.
For instance, want to install and activate the Yoast SEO plugin? Just type this and hit enter:
wp plugin install wordpress-seo --activate
That one command finds the plugin by its official slug (wordpress-seo), downloads it, unzips it, installs it, and activates it. All in about two seconds. It’s a massive time-saver.
For anyone managing more than one WordPress site, mastering WP-CLI is a game-changer. It transforms repetitive, multi-click tasks into a single, instant command, boosting your productivity significantly.
Got a premium plugin as a .zip file on a remote URL? WP-CLI can handle that too, without you ever having to download it first.
wp plugin install https://example.com/path/to/premium-plugin.zip --activate
This is an incredibly slick way to deploy custom or premium plugins across multiple sites. By learning just a few commands, you gain a level of speed and precision that the standard admin dashboard simply can't offer.
Choosing Your Advanced Installation Method FTP vs WP-CLI
For those ready to move beyond the dashboard, the choice between FTP and WP-CLI often comes down to the specific task and your comfort level with the command line.
| Feature | FTP/SFTP Installation | WP-CLI Installation |
|---|---|---|
| Interface | Graphical (drag-and-drop file explorer) | Text-based (command line terminal) |
| Best For | Troubleshooting (e.g., locked out of admin), one-off manual uploads, visual confirmation. | Bulk actions, automation, scripting, managing multiple sites, speed, and efficiency. |
| Speed | Slower, as it depends on manual clicks and drag-and-drop actions. | Extremely fast; commands execute almost instantly. |
| Learning Curve | Low. If you can use a file explorer, you can use FTP. | Steeper. Requires familiarity with the command line and specific WP-CLI commands. |
| Typical Use Case | "My site is down! I need to manually disable a plugin to get back in." | "I need to install and activate this plugin on all 20 of my client sites right now." |
| Requirements | FTP/SFTP credentials from your host and an FTP client. | SSH access to your server and WP-CLI installed on the server. |
Ultimately, FTP is your reliable go-to for emergency access and simple file management. WP-CLI, on the other hand, is the ultimate power tool for developers and agencies looking to manage WordPress sites at scale with maximum efficiency.
A Smart Checklist Before and After You Install
Knowing how to install a WordPress plugin is just the first step. The real skill—the thing that separates a well-managed site from a chaotic one—is treating every new plugin with a careful, methodical approach. A few minutes of prep work now can honestly save you hours of headaches later.
Before you even think about clicking "Install Now," it pays to run through a quick pre-flight check. This simple habit will help you dodge conflicts, security holes, and performance drags down the line.
Your Pre-Installation Checklist
First thing's first: back up your website. I can't stress this enough. Things can and do go wrong, and a recent backup is your ultimate safety net. It’s the undo button that lets you instantly roll back if a new plugin breaks something critical.
Once you’re safely backed up, it’s time to vet the plugin itself.
- Confirm Compatibility: On the plugin's page, look for the "Tested up to" version. If it hasn't been tested with your current WordPress version, you're taking a gamble.
- Read Recent Reviews: Don’t just glance at the star rating. Dig into the most recent reviews. A plugin that was brilliant a year ago might be a buggy, unsupported mess today.
- Check the Support Forum: The support tab is a goldmine of information. Are the developers actively answering questions? A silent or neglected forum is a huge red flag.
- Verify Active Maintenance: The "Last updated" date is a deal-breaker. If a plugin hasn't been updated in six months or more, consider it abandoned. It could quickly become a security risk.
A plugin is a commitment. You're not just adding a feature; you're inviting a piece of third-party code into your site. Taking a moment to check its credentials ensures you're letting in a responsible guest.
This diligence is more than just good practice—it's essential security. Statistics show that around 95% of vulnerabilities stem from outdated plugins, and WordPress sites are a constant target for attacks. This is precisely why a security tool like Wordfence is often one of the very first plugins people install on a new site.
The Critical After-Installation Steps
Getting the plugin installed and activated is only half the job. What you do right after is just as important for keeping your site healthy and running smoothly.
Your first move should be to dive into the plugin’s settings. Very few plugins work perfectly out of the box. Find its new menu item in your dashboard—it's usually under "Settings," "Tools," or its own top-level tab—and get it configured. For example, a caching plugin needs you to enable certain optimizations, and a contact form plugin won't work until you set up email notifications.
After tweaking the settings, it's time to play detective and test for problems. A new plugin can easily clash with your theme or another plugin you already have.
Immediate Post-Installation Actions
- Test Core Functionality: Click through your site's most important pages. Do your contact forms, checkout process, and other key features still work correctly?
- Check for Visual Glitches: Look for broken layouts, missing images, or weird formatting on the front end. These are often the first signs of a CSS or JavaScript conflict.
- Run a Performance Check: Does the site feel sluggish? Use a tool like GTmetrix or Google PageSpeed Insights to run a quick before-and-after comparison.
If you hit a snag, the quickest way to troubleshoot is to deactivate the plugin you just installed. If the problem vanishes, you've found your culprit. From there, you can check the developer's support forum for a fix or start looking for an alternative. If things go really wrong, knowing how to restore your WordPress site from a backup is an invaluable skill.
Finally, get into a routine for updates. Keeping plugins updated is the single most important thing you can do for your site's security. Just set a weekly reminder to check for and apply any updates, and you'll be in great shape.
Common Questions About WordPress Plugins
Once you get the hang of installing plugins, you'll probably still have a few questions. That's totally normal. Let's run through some of the most common ones that pop up, so you can handle your site with confidence. These are the little details that often get overlooked but make a huge difference in keeping your website healthy.
How Many Plugins Is Too Many?
This is the big one. Everyone wants to know the magic number, but the truth is, there isn't one. The real issue is quality over quantity.
A site running 30 well-built, efficient plugins will almost always run faster than a site bogged down by just five bloated, poorly coded ones. The plugins that really kill performance are the ones that make endless database requests or load heavy scripts on every single page, whether they're needed or not.
So, what's a reasonable number? Most WordPress sites we see are running somewhere between 12-15 plugins. That seems to be the sweet spot for adding essential features without sacrificing speed. This is a big reason why WordPress powers a staggering 43.3% of all websites—its flexibility is built on plugins. You can read more about the growth of the WordPress ecosystem to see just how central they are.
My advice? Only install what you absolutely need. If a plugin adds a tiny feature to a single page that gets almost no traffic, you have to ask yourself if it's worth the potential performance hit across your entire site.
A good rule of thumb is to treat your plugin list like a well-organized toolkit. Every tool should have a specific, essential purpose. If you have three different hammers when you only need one, it's time to clean up.
Installed vs. Active Plugins: What's the Difference?
You'll notice on your Plugins page that some are "active" and some are just sitting there. It's a simple but important distinction.
- Installed Plugins: The plugin's files are on your server, but it's turned off. It’s completely dormant and has zero effect on your site's speed or security.
- Active Plugins: This plugin is turned on and running. It's adding features to your site and using server resources.
Think of it like the apps on your phone. You can have an app installed, but it doesn't do anything until you actually open it. Deactivating a plugin is a great first step when you're trying to figure out if it's causing a problem.
What If a Plugin Breaks My Site?
It happens to the best of us. You install a new plugin, and suddenly, your contact form disappears or the layout looks wonky. This is almost always a plugin conflict. It means two plugins (or a plugin and your theme) are fighting over the same resources.
Don't panic. The fix is usually straightforward.
Start by deactivating the plugin you just installed. If that fixes the problem, you've found your culprit. If the issue persists, you might have to go down your list and deactivate plugins one by one until you find the one causing the trouble. We have a complete walkthrough that makes this process easy, check out our guide on the 7 steps to fix plugin conflicts.
How Do I Uninstall a Plugin the Right Way?
When you're done with a plugin, don't just leave it deactivated. An old, forgotten plugin can become a security backdoor if a vulnerability is discovered later on. Always delete what you're not using.
First, you have to deactivate the plugin. Once you do, you'll see a red "Delete" link appear. Clicking that removes its files from your server for good.
While some plugins might leave a few settings behind in your database, the standard delete process is enough to keep your site clean and secure. Regular cleanups are just part of good website hygiene.
At OneNine, we know that a great website is about more than just installing plugins—it’s about having a smart strategy for performance, security, and growth. We build custom websites and provide ongoing maintenance to make sure your online presence is powerful and professionally managed. Let us worry about the tech, so you can focus on your business. https://onenine.com


