

Looking to add some new features to your WordPress site? Plugins are the way to go, whether you're adding a simple contact form or building out a full-blown e-commerce store. For free plugins, it's usually just a couple of clicks, while premium ones just need a quick upload. It’s a lot easier than you might think.
Understanding Your Plugin Installation Options
Plugins are essentially apps for your website, adding specific functions you need. It's no surprise there are so many available, considering WordPress powers a massive 43.4% of all websites on the internet. That incredible market share has fueled a huge ecosystem of plugins for just about anything you can imagine.
This guide will cover the three main ways you can get a plugin up and running on your site. We’ll go from the easiest method to the more technical ones, so you’ll be prepared for any situation.
The 3 Main Ways To Install a WordPress Plugin
- From the WordPress Admin Dashboard: This is your first stop. It's the most straightforward way to find and install free plugins directly from the official WordPress repository without ever leaving your site.
- By Uploading a ZIP File: If you buy a premium plugin from a developer, you'll typically get a .zip file. This method involves uploading that file directly through your WordPress dashboard.
- Using FTP/SFTP: This is the manual, hands-on approach. It’s perfect for when you need to troubleshoot a problem, or if for some reason you can't access your WordPress admin area. You'll connect directly to your server and upload the plugin files there.
To give you an idea of where most plugins come from, take a look at this breakdown.
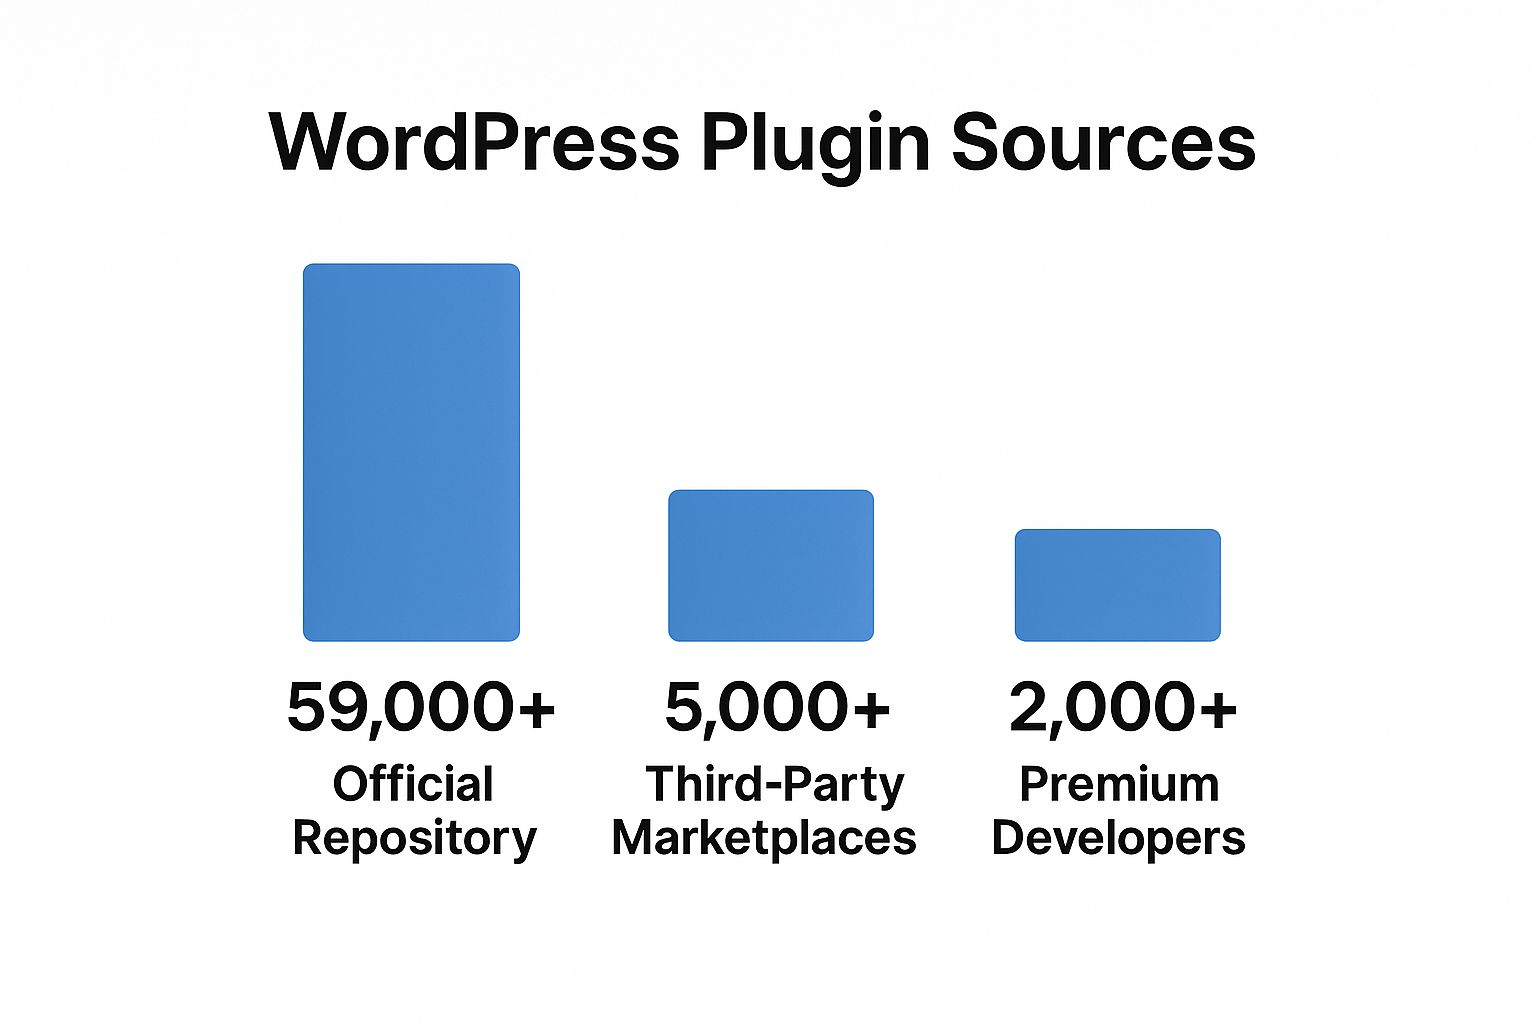
As the chart shows, the official repository is the source for the overwhelming majority of plugins, which is why the dashboard method is so popular. If the concept is still a bit new, it's worth taking a moment to understand what is plugin in website before you start installing them.
Each installation method has its place. To make it easier to decide which one is right for you, I've put together a quick comparison table.
Comparing Plugin Installation Methods
This table breaks down the three installation methods, helping you choose the best approach based on your situation and comfort level.
| Installation Method | Best For | Difficulty Level | Tools Needed |
|---|---|---|---|
| WordPress Dashboard | Beginners, installing free plugins from the official repository. | Easy | Just your WordPress login. |
| Manual ZIP Upload | Installing premium or third-party plugins. | Easy | WordPress login, the plugin's .zip file. |
| FTP/SFTP | Troubleshooting, when the dashboard is inaccessible, or for developers. | Intermediate | FTP/SFTP client (like FileZilla), server credentials. |
Ultimately, knowing all three methods makes you a more capable WordPress user. You'll almost always use the dashboard, but when a problem pops up, knowing how to use FTP can be a real lifesaver.
Using the Official WordPress Plugin Directory
If you're just getting started, the easiest and safest way to add a plugin is by using the official WordPress Plugin Directory. This is a massive, trusted library of free plugins that have all been reviewed by the WordPress team. Best of all, it's built right into your dashboard, so you can find, install, and activate new features in just a few clicks without ever leaving your site.
Think of it as the app store for your website. It’s designed to be completely straightforward. You don't need to know any code or have any special technical skills—if you can find your way around the WordPress admin menu, you're good to go.
Getting to the Plugin Installer
First things first, log into your WordPress admin dashboard. Look over at the left-hand menu and find Plugins. When you hover your mouse over it, a little submenu will pop out. From there, just click Add New.
This will land you on the "Add Plugins" screen, which is your portal to that entire library I mentioned. You'll see some featured and popular plugins right away, but the real magic is in the search bar.
How to Find and Vet the Right Plugin
Let's walk through a common scenario. Imagine you want to get your site ranking better on Google. A fantastic and widely-used tool for this is Yoast SEO.
Head up to the search bar in the top right corner and type in "Yoast SEO." WordPress will immediately show you the results. Now, before you jump to install it, it’s smart to take a second and look at the details. Here’s what I always check:
- Active Installations: This tells you how many websites are currently running the plugin. A huge number, like Yoast’s 5+ million, is a massive vote of confidence.
- Star Rating: Community feedback is gold. Look for plugins with plenty of high star ratings, as it shows people are generally happy with it.
- Last Updated: Is the developer still actively working on it? A recent "Last Updated" date means they're likely fixing bugs, patching security holes, and keeping it compatible with new WordPress versions. This is crucial.
- Compatibility: The listing will also tell you if the plugin has been tested with your version of WordPress. You definitely want to see that checkmark to avoid potential conflicts.
The official WordPress Plugin Directory is home to over 60,300 plugins, which is an staggering number. But get this—only about 62 of them have more than one million active installations. That really shows you how tough the competition is and why sticking with popular, well-supported plugins is usually the safest bet. For instance, Yoast SEO has been downloaded over 550 million times, a testament to its long-term reliability. If you're curious, you can find more cool WordPress statistics that paint a picture of the whole ecosystem.
Installing and Activating the Plugin
Okay, so you've done your homework and picked the right plugin. The hard part is over. Next to the plugin's name, you'll see an Install Now button. Go ahead and click it.
WordPress will work its magic in the background, downloading and setting up the files. In a few moments, that button will change to say Activate. Click it one more time.
And that's all there is to it! The plugin is now live on your site. Most plugins will add a new menu item to your main admin sidebar or tuck their settings under the "Settings" tab. In our Yoast example, a new "SEO" menu would appear, ready for you to start configuring. This simple workflow is fundamental to learning how to install a plugin in WordPress like a pro.
Manually Uploading a Plugin ZIP File
The official plugin directory is fantastic for freebies, but the real power often comes from premium plugins. When you buy a plugin from a marketplace like CodeCanyon or directly from a developer, you'll almost always get it as a .zip file.
Don't worry, WordPress has a built-in uploader that makes installing these just as easy. Knowing how to do this is a core skill for any serious WordPress user, opening the door to a whole new world of advanced features.
Finding the Upload Feature
First, head back to the plugin installation screen in your dashboard. Just go to Plugins > Add New.
Look right at the top of the page, next to the "Add Plugins" title. See that Upload Plugin button? Click it, and a simple file upload form will appear. It's one of those things that’s hidden in plain sight, but once you find it, you’ll use it all the time.
The Upload and Activation Process
Getting your plugin onto your site is a quick three-step dance.
- Choose Your File: Click the "Choose File" button and find the plugin's .zip file you downloaded earlier.
- Install the Plugin: After selecting the file, its name will show up. Just click Install Now. WordPress does the heavy lifting here, unpacking the archive and putting everything where it needs to go on your server.
- Activate It: Once the installation is complete, you'll see a new screen with a success message. The most important thing here is the Activate Plugin link. Click that to turn it on.
A common trip-up is trying to upload an unzipped folder or individual files. The WordPress uploader is designed to handle a single .zip archive only. If you see an "Incompatible Archive" or "No plugin files found" error, the first thing to check is that you’re uploading the original, complete zip file you downloaded.
What Happens After Activation
Once activated, the plugin is live and ready to go. Just like with plugins from the directory, its settings will usually pop up in a few common places.
You might find a brand-new item in your main dashboard menu or see it tucked away under the existing Settings or Tools menus. For instance, a premium form plugin might add a "Forms" menu to your sidebar. The developer's documentation is always your best friend for figuring out exactly where to look.
Getting comfortable with this manual upload process gives you the freedom to use any WordPress plugin out there, no matter where it came from.
Installing a Plugin with an FTP Client
While the WordPress dashboard is your go-to for most things, sometimes you need to get your hands a little dirty and work directly with your site's files. Manually installing a plugin with an FTP (File Transfer Protocol) client is a skill every serious WordPress user should have in their back pocket.
This method is an absolute lifesaver in a few tricky situations. Let's say a buggy plugin update gives you the dreaded "white screen of death," locking you completely out of your admin area. Or maybe a specific server setting is blocking uploads through the dashboard. When that happens, FTP isn't just another option—it's your rescue plan.
How the FTP Process Works
Think of an FTP client as a direct file manager for your web server. It creates a connection between your computer and the server, letting you drag and drop files as if they were on your own machine. It’s more hands-on than the one-click dashboard install, but it gives you complete control.
To get started, you'll need an FTP application. There are plenty of great, free options out there:
- FileZilla: This is the old reliable. It’s free, works on pretty much any operating system, and millions of people use it.
- Cyberduck: A fantastic choice, especially for Mac users, known for its simple and clean design.
- Transmit: A premium, Mac-only client famous for its speed and powerful features.
You'll also need your FTP login details from your web host. Look for the host (often your domain name), username, password, and port number in your hosting control panel.
Finding the Right Folder
Once you have your credentials, fire up your FTP client and connect to the server. You'll typically see a split-screen view: your computer's files on one side and your server's files on the other.
First, you need to navigate to your WordPress installation on the server. This is usually inside a folder called public_html, www, or one named after your domain. Once you're inside, you're looking for a specific path that's the same on every WordPress site: wp-content/plugins/.
This plugins folder is the home for every single plugin on your website.
Pro Tip: Before you do anything else, you must unzip the plugin file on your own computer. When you use FTP, you upload the extracted folder, not the
.zipfile itself. This is the most common mistake people make.
Uploading and Activating the Plugin
Okay, you've found the plugins directory on your server. Now, find the unzipped plugin folder on your computer's side of the FTP client.
All you have to do is drag that folder from your local side over to the plugins folder on the server side. Your FTP client will start uploading all the necessary files. Depending on the size of the plugin and your connection speed, this might take a minute or two. Just let it run until it confirms the transfer is 100% complete.
The plugin is now technically on your site, but it's not doing anything yet.
To wake it up, head back to your WordPress admin dashboard and click on Plugins. You'll see the plugin you just uploaded sitting in the list, waiting patiently. Just click the Activate link, and you’re good to go. The plugin is now live and running.
Solving Common Plugin Installation Issues
Sooner or later, it happens to everyone. You go to install a new plugin, and something just breaks. It’s frustrating, and for a moment, you might even feel a little bit of panic. But don't worry—most installation errors are surprisingly common and usually have a straightforward fix. Think of this section as your troubleshooting guide for when things go sideways.
We're going to walk through some of the most frequent hiccups, from cryptic error messages to that dreaded blank screen. With the right know-how, you can diagnose and solve these problems without breaking a sweat.
Tackling the White Screen of Death
The "White Screen of Death" (WSoD) is a classic WordPress problem. You activate a new plugin, and suddenly, your entire site is just a blank white page. It's jarring, but it almost always points to a conflict between the new plugin and another plugin or your theme.
If you’re locked out of your admin dashboard, your FTP client is your lifeline. Just log into your server, navigate to the wp-content/plugins/ directory, and find the folder for the plugin you just installed. Rename it—adding something like -old to the end works perfectly. Renaming the folder instantly deactivates the plugin, and nine times out of ten, your site will pop right back up. We have another guide that dives deeper into how to https://onenine.com/7-steps-to-fix-plugin-conflicts/ if you need more help.
Resolving Memory Limit Errors
Ever been hit with a "Fatal error: Allowed memory size of… exhausted"? This message is telling you that your website’s server doesn’t have enough PHP memory to process what the plugin is trying to do. This is a pretty common issue with bigger, more feature-rich plugins.
Luckily, the fix is usually simple. You just need to increase your site's memory limit. You can do this by editing your wp-config.php file, which you'll find in the main directory of your WordPress installation. Open the file and add this line of code right before the comment that says, /* That's all, stop editing! Happy publishing. */:
define( 'WP_MEMORY_LIMIT', '256M' );
That one line often gives WordPress the breathing room it needs to finish the installation without any more drama.
When you think about it, conflicts and resource issues are bound to happen. The average WordPress site has around 21 plugins. And with the United States leading global usage at 11.26%, that's a lot of moving parts. It’s why security plugins like Wordfence are so essential, boasting over 4.2 million active installations to help keep things in check.
Fixing Failed Installation Notices
Sometimes, WordPress just gives you a vague "Installation Failed" or "The package could not be installed" message with no real explanation. When this happens, it’s usually one of a few culprits.
- Incorrect File Permissions: Your server might be set up in a way that prevents WordPress from adding new files to your plugin directory.
- A Bad ZIP File: The plugin file you downloaded could be corrupted or incomplete. The easiest first step is to just download a fresh copy.
- Hosting Restrictions: Some web hosts have strict security rules that can interfere with uploads from the WordPress dashboard.
If the dashboard upload keeps failing, this is the perfect time to switch gears and try the FTP method. By uploading the unzipped plugin folder directly to your server, you can sidestep whatever is causing the dashboard to choke on the installation.
Answering Your Top Questions About WordPress Plugins
https://www.youtube.com/embed/D7n0cvKU68E
Once you get the hang of installing plugins, you'll probably start wondering about a few things. It's great to be able to add new features with just a few clicks, but what does that mean for your site's speed, security, and overall health?
Let's tackle some of the most common questions I hear from people. Getting these straight will help you manage your site with a lot more confidence.
How Many Plugins Are Too Many?
Ah, the classic question. The honest answer? There's no magic number. I've seen sites with 20 well-coded plugins run circles around sites struggling with just five poorly built ones. The real culprit is almost always code quality and performance, not the sheer quantity.
Instead of obsessing over the count, focus on only using high-quality plugins that you absolutely need. Get into the habit of regularly testing your site's speed and, more importantly, deactivating and deleting any plugins that are just sitting there unused. It’s good housekeeping that cuts down on bloat and closes potential security backdoors.
The bottom line is this: prioritize quality over quantity. A lean set of essential, well-maintained plugins will always be better than a huge collection of tools you barely touch.
What's the Difference Between Installing and Activating a Plugin?
It's a common point of confusion, but "installing" and "activating" are two separate steps. Knowing the difference is key to managing your site and troubleshooting when things go wrong.
- Installing a plugin is like downloading an app to your phone. The files are copied to your server, but nothing is happening yet. The plugin is on your site, but it's completely dormant.
- Activating a plugin is like opening that app for the first time. This is the step that actually "turns on" the plugin, runs its code, and makes its features available on your site.
This two-step process is actually really helpful. It means you can upload a plugin now but wait to activate it until you're ready, which is perfect for staging new features or preparing for a big update. After you activate a new plugin, it’s always a good idea to learn how to clear WordPress cache to make sure your changes show up for visitors.
Is It Safe to Install Plugins from Outside the WordPress Directory?
It definitely can be, but you have to be smart about it. The golden rule is to only download from reputable, trusted sources. Premium plugins from well-known developers—think tools like WP Rocket or Gravity Forms—or established marketplaces like CodeCanyon are generally safe bets.
The real danger lies with random, unverified websites or "nulled" plugins. These are pirated versions of paid tools, and they are notorious for being packed with malware that can hijack your website. Before you install anything from a third-party source, do your homework. Research the developer, look for recent updates, and read what other users have to say.
At OneNine, we simplify website management so you can focus on your business. From custom development to ongoing maintenance and support, we're your dedicated partner in digital success. https://onenine.com


