So, you want to install a WordPress plugin. On the surface, it seems almost too easy. You search for a plugin in your dashboard, click ‘Install Now,’ and then ‘Activate.’ Done. But if you’re looking to transform a basic website into something special—say, a full-blown ecommerce store or a lead-generating machine with sleek contact forms—there’s a bit more to it than that.
Why a Safe Plugin Process Matters
Getting this right from the start means having a reliable process you can count on. Whether you're a small business owner, a marketer, or the person in charge of the company website, you need a repeatable workflow for adding new features without accidentally breaking things.
Let's be real: one bad plugin can tank your site's speed, open up glaring security holes, or even take your entire site offline. This is exactly why a thoughtful, step-by-step approach is non-negotiable.
Building a Reliable Workflow
This guide goes way beyond the simple "click to install" method. We'll walk through five different ways to get a plugin onto your site, so you'll know exactly which tool to use for any given situation.
Here are the methods we'll cover:
- WordPress Dashboard Search: Your go-to for free plugins right from the official repository.
- Manual ZIP Upload: The standard for any premium or custom-coded plugins you buy.
- FTP/SFTP Installation: For when you need direct server access, often for troubleshooting.
- cPanel File Manager: A more visual, user-friendly alternative to FTP.
- WP-CLI: A powerful command-line interface for developers and more technical users.
Even more importantly, we’ll dig into the security checks, pre-installation steps, and ongoing maintenance that keep a website healthy. For many, the journey begins by recognizing WordPress as one of the best CMS options for small businesses, and that understanding helps frame every decision you make, including which plugins you choose.
The goal isn't just to install a plugin; it's to enhance your site's functionality while protecting its performance and security. A disciplined process turns a potentially risky task into a safe, routine upgrade.
Ultimately, having a structured process is what separates a high-performing site from a problematic one. We’ll show you exactly how to build that process, turning every new feature into a genuine asset, not a liability. This mindset shifts website management from a reactive chore into a real strategic advantage.
A Crucial Pre-Installation Checklist
Before you even think about clicking "Install Now," let's talk about a quick pre-flight check. I know how tempting it is to rush ahead when you've found a plugin that promises to add that one feature you've been dying for. But trust me, a few minutes of prep is the difference between a smooth update and a frantic, late-night call to your developer.
This isn’t just about dodging bugs—it’s a core security habit.
First things first: back up your website. Always. Think of it as your ultimate undo button. If a plugin decides not to play nice and breaks your layout (or worse, crashes your entire site), a fresh backup lets you hit rewind and restore everything in minutes.
Many good hosting providers include automated daily backups, which is great. But I always recommend doing a quick manual backup right before you install anything new. That way, you have a perfect, clean restore point from that exact moment. If you want a deeper dive, we have a helpful guide on creating solid website backups.
Vet the Plugin Before You Commit
Okay, backup is done. Now it’s time to play detective and investigate the plugin itself. The WordPress repository is full of gems, but there are also plenty of duds. A little digging on the plugin’s official page can tell you everything you need to know.
Here’s my personal checklist for vetting a new plugin:
- Last Updated: Has it been updated in the last few months? If not, the developer might have abandoned it, which is a red flag for security vulnerabilities.
- Active Installations: A high number here (we're talking tens of thousands or more) is a great sign. It means a lot of other people trust it.
- Version Compatibility: Make sure it's tested and compatible with your current version of WordPress. This little detail prevents a world of headaches.
- Reviews and Ratings: Don’t just look at the average star rating. Read the recent one-star reviews to see what problems people are having, and read the five-star ones to see what it does well.
A plugin with 500,000+ active installations and an update from two weeks ago is a much safer bet than one with 1,000 installations that hasn't been touched in over a year. This data isn't just for show; it's a direct indicator of the plugin's health.
The Power of a Staging Environment
If your website is important to your business—and I'm guessing it is—installing a new plugin directly on your live site is a gamble. You don't need to take that risk. This is where a staging site becomes your best friend.
A staging site is simply an exact, private clone of your live website. It's your personal sandbox. You can install the new plugin there, mess with the settings, and try to break things without affecting a single visitor.
Does the new plugin slow your site to a crawl? Does it conflict with your theme or another critical plugin like your payment gateway? These are the kinds of questions you want to answer in a safe environment. Once you’ve confirmed everything is working perfectly, you can confidently repeat the process on your live site. This simple workflow turns a potentially stressful task into a safe and professional procedure.
The 5 Ways to Install a WordPress Plugin
Knowing how to install a WordPress plugin seems simple, but in reality, there's more than one way to do it. The method you choose often depends on the situation. Are you grabbing a freebie from the official directory, uploading a premium plugin you just bought, or maybe even troubleshooting a broken site? Each scenario has a best practice.
Before you touch a single plugin, though, it’s critical to follow a simple three-step safety process: Backup, Test, and Vet.
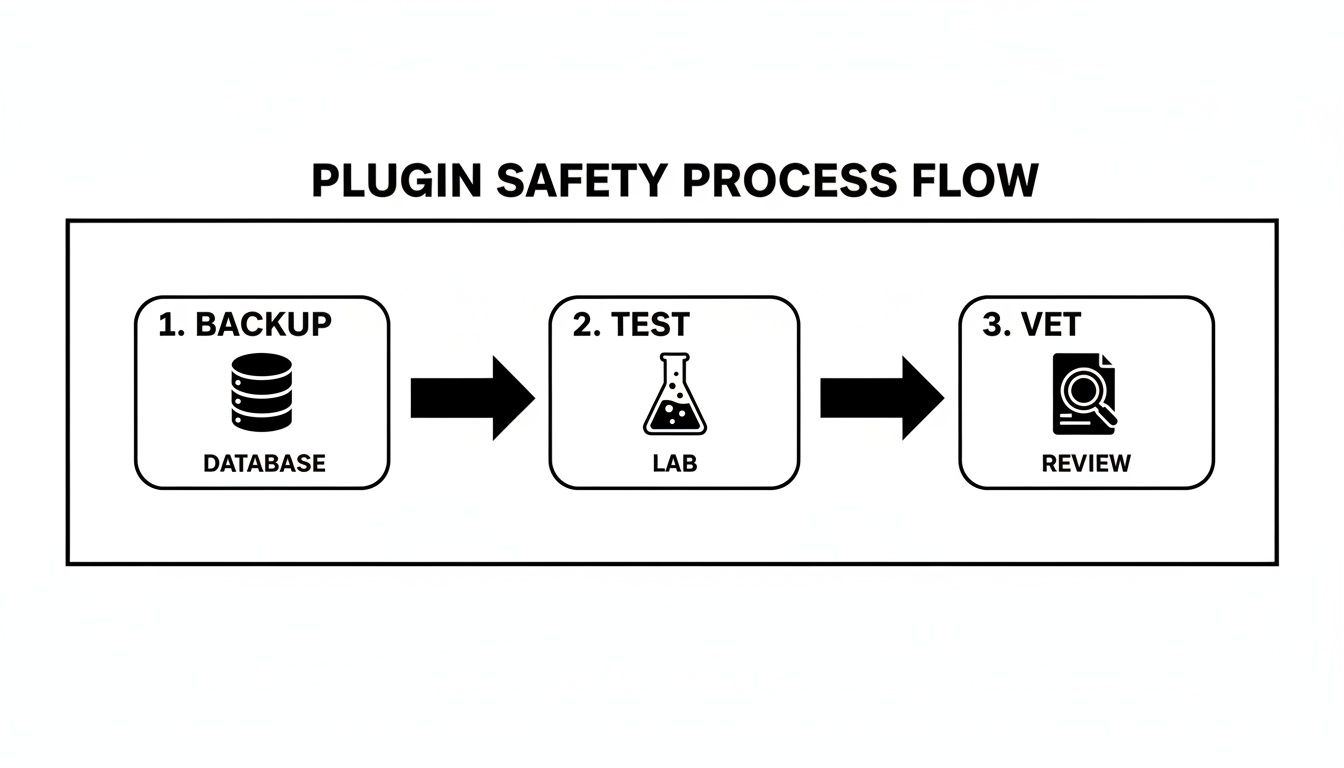
Treating every new plugin install with this level of care turns what could be a risky guess into a professional, controlled update. With that in mind, let's walk through the five key methods for getting plugins onto your site.
H3: 1. Search and Install From the WordPress Dashboard
This is the go-to method for probably 99% of plugin installations. It's the simplest, safest, and most direct route for adding free plugins that have been vetted and approved for the official WordPress.org repository. If you're just starting out, this is where you'll live.
It really is as easy as it sounds:
- In your dashboard, head to Plugins > Add New Plugin.
- Use the search bar to look for a plugin by name (like "Yoast SEO") or by what it does (like "image compression").
- When you find the one you want, click Install Now. WordPress will handle the rest.
- Once it's done, the button will change to Activate. Give it a click, and you're good to go.
H3: 2. Upload a Plugin ZIP File Manually
What about plugins you buy from premium marketplaces like CodeCanyon or directly from a developer? They always come as a downloadable .zip file. WordPress has a built-in uploader just for this.
You’ll start in the same place: Plugins > Add New Plugin. But instead of searching, look for the Upload Plugin button at the top of the page. Click it, choose the .zip file from your computer, and hit Install Now. After it uploads and unpacks, you'll just need to activate it.
My Two Cents: Whatever you do, don't unzip the plugin file yourself before uploading it. The uploader needs the original, compressed .zip file to work correctly. It's a common mistake that will just give you an error message.
Learning this skill is more than just a technicality; it's a core part of running a modern website. As of early 2024, WordPress powers an incredible 43% of all websites, and with over 60,000 plugins in the ecosystem, your choices directly impact your site's security, speed, and marketing power.
H3: 3. Use an FTP/SFTP Client
Sometimes, things go wrong. Maybe your site is down, or a server setting is preventing you from uploading files through the dashboard. In these cases, connecting directly to your server via FTP (File Transfer Protocol) or, even better, SFTP (Secure File Transfer Protocol) is a lifesaver.
You'll need an FTP client (like the popular and free FileZilla) and your server login details from your host. The process involves a few more steps:
- Download the plugin's .zip file and unzip it on your computer.
- Connect to your server using the FTP client.
- Navigate to the
/wp-content/plugins/directory. - Drag the unzipped plugin folder from your desktop into that directory on the server.
Once the upload finishes, head back to your WordPress dashboard. The plugin will be sitting in your list, waiting for you to click Activate. This method is also a fantastic troubleshooting tool. If a bad plugin ever locks you out of your admin area, you can use FTP to find its folder and rename it, which instantly deactivates it and should restore your access.
H3: 4. Install Through cPanel's File Manager
If you're not quite comfortable using an FTP client but still need to upload a plugin manually, the File Manager inside your hosting account's cPanel is the perfect middle ground. It gives you a browser-based view of your server's files without needing any extra software.
The steps are almost identical to the FTP method, just with a different interface:
- Log in to your hosting cPanel and open the File Manager.
- Find your way to the
/wp-content/plugins/folder. - Click the Upload button, select the plugin's .zip file, and let it upload.
- Once it's there, right-click on the .zip file and choose Extract.
- You can delete the leftover .zip file to keep things tidy.
Finally, pop over to your WordPress dashboard, find the new plugin in the list, and activate it. Easy.
For a different perspective on these installation methods, the team at websitesusa.com put together a solid resource that you might find useful: How to Install a Plugin in WordPress: A Complete Guide for 2024.
H3: 5. Use the Command Line with WP-CLI
For developers, agencies, and anyone who loves efficiency, there's WP-CLI (WordPress Command-Line Interface). This powerful tool lets you manage every aspect of your site—including plugins—with simple text commands. It's by far the fastest way to get things done once you're set up.
You'll need SSH access to your server and WP-CLI installed (most good hosts offer both). Once you're connected via the terminal, you can install and activate a plugin from the official repository with a single line.
To install and activate the Yoast SEO plugin, for example, you’d just type:wp plugin install wordpress-seo --activate
You can even install a plugin directly from a URL to a .zip file. For anyone managing multiple sites or automating deployment workflows, mastering WP-CLI is a game-changer.
Choosing Your WordPress Plugin Installation Method
Feeling a bit overwhelmed by the options? Don't be. Each method has its place, and you'll likely only use one or two regularly. This table breaks down when to use each one.
| Method | Best For | Difficulty Level | Tools Required |
|---|---|---|---|
| Dashboard Search | Everyday use; installing free plugins from the official directory. | Beginner | WordPress Admin Access |
| Dashboard Upload | Installing premium or custom plugins that come in a .zip file. | Beginner | WordPress Admin Access |
| FTP/SFTP | Troubleshooting, bypassing dashboard errors, or when you're locked out. | Intermediate | FTP Client, SFTP Credentials |
| cPanel File Manager | A user-friendly alternative to FTP for manual uploads and extraction. | Beginner-Intermediate | cPanel Hosting Login |
| WP-CLI | Developers and power users who need to automate or manage sites quickly. | Advanced | SSH Access, WP-CLI |
Most of the time, you’ll stick with the first two methods. But knowing the others exist gives you the confidence to handle any situation that comes your way.
Why Smart Plugin Management Is Non-Negotiable
Getting a plugin installed is really just the first step. The real work—the part that separates a fast, secure website from a slow, vulnerable one—is everything that comes after. Good plugin management isn’t a one-and-done task; it's an ongoing commitment to keeping your site healthy.
Think of every plugin as a small piece of software running on your website. Just like your phone's operating system or the apps on your computer, they need regular attention to work properly and safely. Ignoring them is like leaving a side door to your business wide open.
From a pure risk-management standpoint, knowing how to properly handle your plugins is a security essential. It's a shocking statistic, but outdated plugins are responsible for roughly 95% of all reported WordPress vulnerabilities. That makes them the single biggest technical risk for most websites. With WordPress powering over 587 million sites, as noted in recent WordPress statistics from Hostinger, sloppy plugin habits create a massive weak point across the web.
Your Best Defense: The Update Imperative
If you build only one habit, make it this: keep your plugins updated. When a developer pushes out a new version, it’s not always about adding flashy features. More often, those updates contain critical security patches that close loopholes discovered by researchers or, even worse, by hackers.
Putting off an update for even a few days can be all the time an automated bot needs to scan the web, find your site, and exploit a known weakness. It happens fast.
An outdated plugin is an open invitation for trouble. Each update acts as a patch, sealing potential entry points that could otherwise be used to compromise your website, steal data, or inject malicious code.
The Problem with Plugin Bloat
Over the years, it's incredibly easy to collect a pile of plugins you don't even use anymore. Maybe you tested a social media plugin for a campaign that ended last year, or you installed a cool slider you've since replaced with something better. Each one of those inactive plugins is an unnecessary security risk.
Even when a plugin is deactivated, its files are still sitting on your server. If a vulnerability is found in that code, it can still be a potential target. This is precisely why a regular plugin audit is so important.
A lean plugin library is a secure one. By cleaning out plugins you aren't using, you minimize your "attack surface"—a technical way of saying you're reducing the number of doors a hacker could try to open.
A Practical Plugin Audit Checklist
I recommend setting a calendar reminder to audit your plugins once a quarter. It’s a quick job that pays huge dividends for your site’s security. Just navigate to your Plugins > Installed Plugins page and ask a few simple questions for each one:
- Is this plugin actually being used? If you can’t immediately remember what it does, it’s probably a good candidate for deletion.
- Does another plugin already do this job? Sometimes a new, multi-function tool makes an old, single-purpose plugin redundant. Get rid of the old one.
- Has the developer abandoned this plugin? Check the "Last Updated" date. If it hasn't been touched in over a year, it's a major liability. It's time to find a modern, actively supported alternative.
By consistently updating what you need and deleting what you don't, you turn plugin management from a chore into a core part of your security strategy. It’s not just about knowing how to install plugins for WordPress; it’s about managing them responsibly to protect your site, your customers, and your reputation.
What to Do When a Plugin Installation Goes Wrong
Sooner or later, it happens to everyone. You install a new plugin, and suddenly your site breaks, a feature stops working, or you’re staring at an error message you've never seen before. The first rule is simple: don't panic. Most plugin problems are fixable.
Usually, the issue boils down to a few common culprits. You might have a conflict with your theme or another plugin, your hosting server might not have enough resources allocated, or file permissions are preventing WordPress from doing its job.
Let's break down how to handle the most common headaches.
The Infamous White Screen of Death
It’s the most dreaded sight for any WordPress user—the "White Screen of Death" (WSoD). One minute your site is working, the next it’s just a blank white page. This almost always points to a fatal PHP error, often triggered by a bad plugin.
If you can’t even get into your admin dashboard, you'll need to get your hands a little dirty and manually disable the plugin. The easiest way is with an FTP client or your host's cPanel File Manager.
Here's the game plan:
- Connect to your server and head to the
/wp-content/plugins/directory. - Find the folder belonging to the plugin you just activated.
- Simply rename the folder—something like
my-plugin-disabledwill do the trick.
Renaming the folder instantly deactivates the plugin, which should bring your site right back. From there, you can log in, investigate the root cause, or just delete the troublemaker for good.
Decoding Common Error Messages
Sometimes, you get lucky and WordPress gives you a specific error message instead of a blank screen. These messages are your best clues for figuring out what went wrong.
Here are a few errors you’ll likely run into and what they actually mean:
- "Destination folder already exists": This usually pops up if you tried to delete a plugin but some files were left behind. Just log in via FTP or your File Manager, find the old plugin folder in
/wp-content/plugins/, and delete it completely. Then, try installing it again. - "The uploaded file exceeds the upload_max_filesize directive": Your web host limits the size of files you can upload through the WordPress dashboard. If you're installing a hefty premium plugin, its .zip file might be too big. The workaround? Use the FTP method to upload the unzipped plugin folder directly.
- "PCLZIP_ERR_BAD_FORMAT": This technical-sounding error just means WordPress doesn't recognize the file as a proper .zip file. It could have been a corrupted download, or maybe you accidentally zipped an already-zipped file. The fix is easy: download a fresh copy from the source and try uploading it one more time.
Plugin conflicts are incredibly common, especially on sites that rely on a lot of different tools. Two plugins might try to use the same code, leading to a crash. Knowing how to systematically find and fix these conflicts is a must-have skill for any site owner. Our guide dives deeper, offering 7 steps to fix plugin conflicts and get your site back to normal.
Plugin Strategy for Ecommerce and Multisite
When your website is more than just a blog—when it's your actual business—the way you handle plugins needs to change. For ecommerce stores and WordPress Multisite networks, one bad plugin decision can hit your revenue or bring down an entire family of sites. This calls for a much more careful, deliberate approach.
Ecommerce sites, for instance, live and die by their checkout process. Adding a new payment gateway, a shipping calculator, or a marketing tool for WooCommerce isn't as simple as clicking "Activate." Every new addition needs to be put through its paces on a staging site first, ensuring it doesn't break the one thing that matters most: a customer's ability to pay you.
Ecommerce Plugin Installation Best Practices
A smooth, error-free checkout is absolutely non-negotiable. Before any new plugin gets near your live store, you have to be positive it won’t cause any problems.
Here’s a quick-and-dirty testing checklist:
- Test Every Payment Gateway: Run test transactions through PayPal, Stripe, and any other payment option you offer.
- Verify Shipping Rules: Make sure your shipping rates are still being calculated correctly for different locations and order sizes.
- Check Core User Journeys: Go through the motions of adding an item to the cart, viewing the cart, and even creating a new user account to catch any unexpected roadblocks.
Ecommerce is a perfect example of how one plugin can define an entire business. WooCommerce, the most popular ecommerce plugin for WordPress, is currently used by over 4.6–5.26 million online stores. It powers a huge chunk of the internet's shops. For those millions of businesses, properly installing and configuring WooCommerce was the moment they officially opened their digital doors.
Managing Plugins in a Multisite Network
Running a WordPress Multisite network adds a whole new level of complexity. As the network admin, you can install a plugin once and make it available to every site on the network—whether that's a dozen or a thousand. It’s an incredibly efficient system, but it demands careful planning.
When you install a plugin on a multisite network, you have two choices:
- Network Activate: This is the "all-in" option. The plugin is forced on for every single site in your network. It’s perfect for the essentials, like your security plugin, a performance cache, or a custom feature you want everywhere.
- Install Only: This simply makes the plugin available. Individual site admins can then choose to activate it on their site if they need it. This is the way to go for specialized plugins that only a few sites will ever use.
My rule of thumb for multisite management is to always choose the path of least resistance. It's much safer to install a plugin and let individual site admins opt-in than to force it on everyone and clean up the mess later. You also have to think about performance—a resource-hungry plugin that’s network-activated can drag down the speed of every single site.
The decision to use a single site or a multisite network fundamentally changes your plugin strategy. If you're weighing the options, our guide on WordPress Multisite vs a single site can help you make the right call for your business. Getting this right from the beginning sets the foundation for everything from user management to how you install plugins for WordPress.
Common Questions (and Straight Answers) About WordPress Plugins
Let's tackle some of the most common questions I hear from people managing their own WordPress sites. Getting these right can save you a lot of headaches down the road.
How Many Plugins Is Too Many?
Honestly, there's no magic number. I've seen sites with 10 lightweight, well-coded plugins run circles around sites struggling with just 5 bloated, resource-hogging ones. The real issue isn't the number of plugins, but their quality and impact on your site's performance.
Think of it this way: every plugin you add is another piece of code running on your site. The goal is to install only what you absolutely need. Get in the habit of auditing your plugin list every few months and deactivating or deleting anything you're no longer using.
Is It Safe to Use a Plugin Not Tested With My Version of WordPress?
You're playing with fire a bit here. That "untested" warning is there for a reason—the plugin author hasn't confirmed it works smoothly with the latest WordPress core updates. This can lead to anything from minor glitches to major security holes.
If you absolutely must use the plugin, the only safe way to proceed is by testing it on a staging site first.
A staging site is basically a clone of your live website where you can test changes without any risk. If the untested plugin runs perfectly there, you can consider installing it on your live site, but just know that a future WordPress update could still break it.
Help! A Plugin Locked Me Out of My Site. What Now?
First off, don't panic. This happens more often than you'd think, and the fix is usually straightforward. You just need to manually disable the plugin that's causing the trouble.
You can do this using an FTP client or the File Manager in your hosting control panel. Here’s what you do:
- Navigate to the
/wp-content/pluginsdirectory in your site's files. - Find the folder named after the plugin causing the lockout.
- Simply rename that folder. I usually just add
-oldto the end of the folder name.
Renaming the folder instantly deactivates the plugin, and you should be able to log back into your WordPress admin area. From there, you can figure out if you want to find a replacement or delete it for good.
At OneNine, we take the complexity out of managing a high-performing website so you can get back to running your business. From development to security and support, we've got you covered. Explore our website management plans to see how we can help.


